BizWorks User Guide
BizIntroduction
Contained in this document is a detailed BizWorks user guide. BizWorks and BizLink make up TaxScribe, an online filing system for business personal property listings. BizWorks is the interface the county employees use to approve forms submitted by tax payers through BizLink. This guide includes information regarding BizWorks specifically - including how to activate it, how to administer users, and how to use all of the functionality that is included within the application.
BizWorks User Management
I. Registration
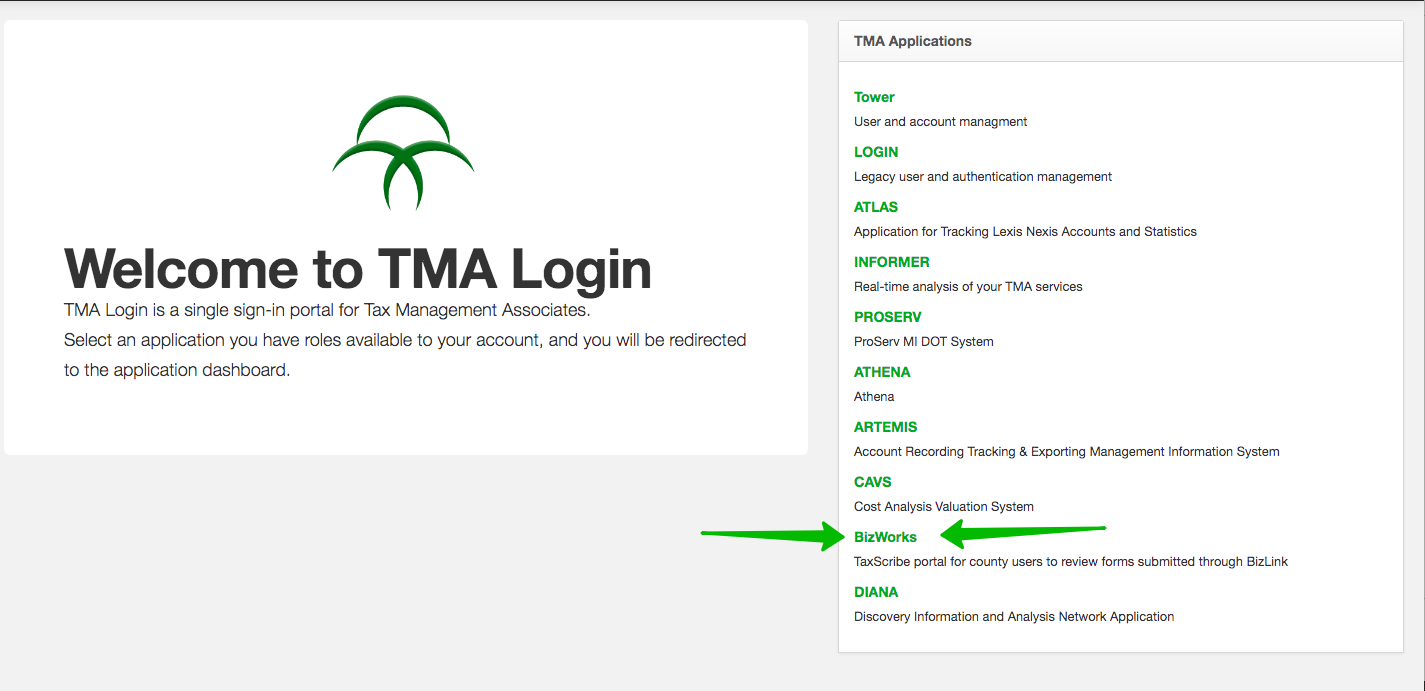
BizWorks will appear on your Reason Consulting Application List once access is granted by Reason Consulting. If your jurisdiction is not currently registered with BizWorks, contact Reason Consulting for assistance.
Once access is granted, BizWorks administrators can add, remove, or modify users. While setting up a new user profile or modifying an existing one, you will see several user permission options. These options are described below. Users can have one or all of these permissions.
- Administrator: Add, remove, or modify users in BizWorks using Reason Consulting Login
- User: Search listings/extensions, assign them individually, and approve or reject forms.
- Bulk Assign Listings: Assign business personal property listings in bulk (use in combination with "user")
- Bulk Approve Extensions: Approve extension requests in bulk (use in combination with "user"
II. Authentication
Users will access BizWorks through Reason Consulting Login. Your BizWorks administrators or Reason Consulting can assist with password resets if necessary.
Search Dashboard
I. Default Search Parameters
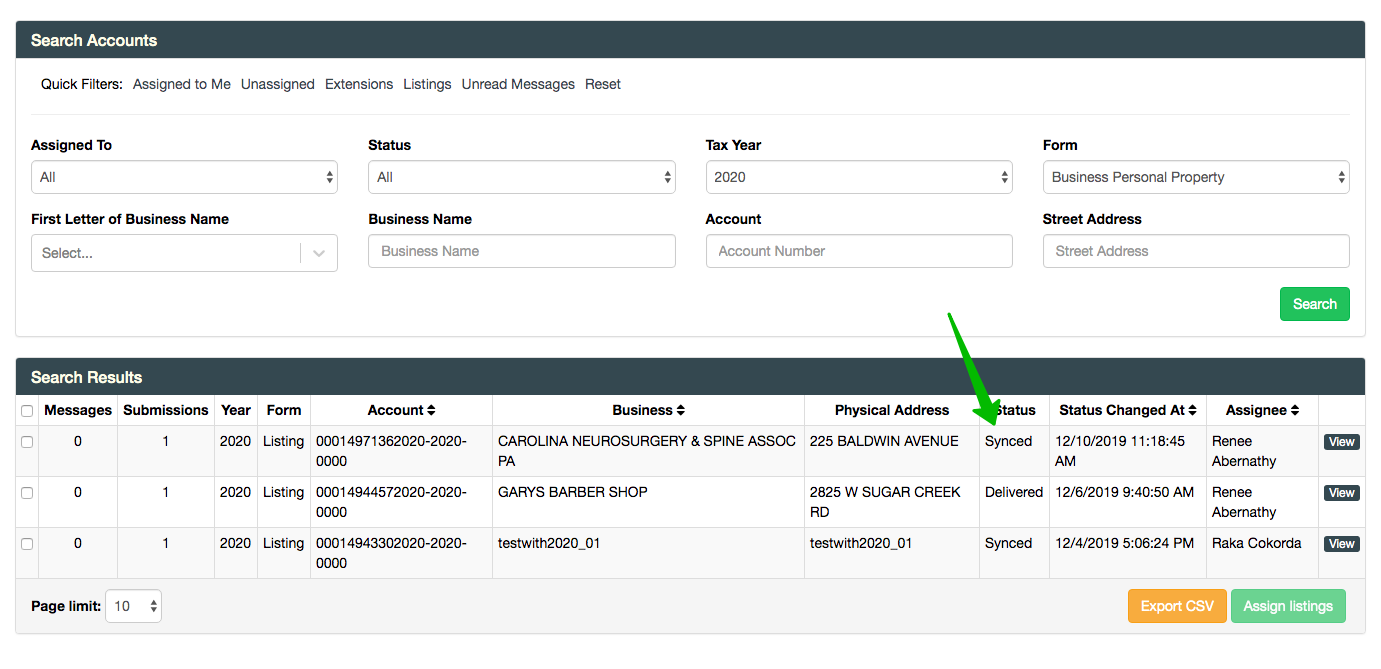
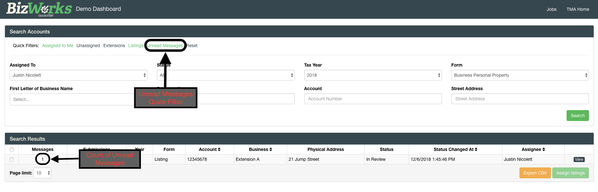
Upon logging in, you will see the Search Dashboard. The search dashboard will default to Unassigned Business Personal Property Listings, but you may search for forms using a variety of options. Several Quick Filters are provided based on the most common types of searches.
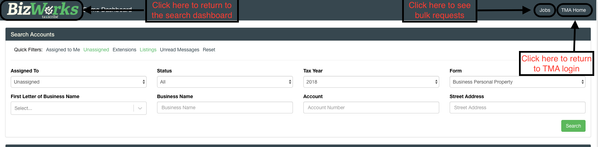
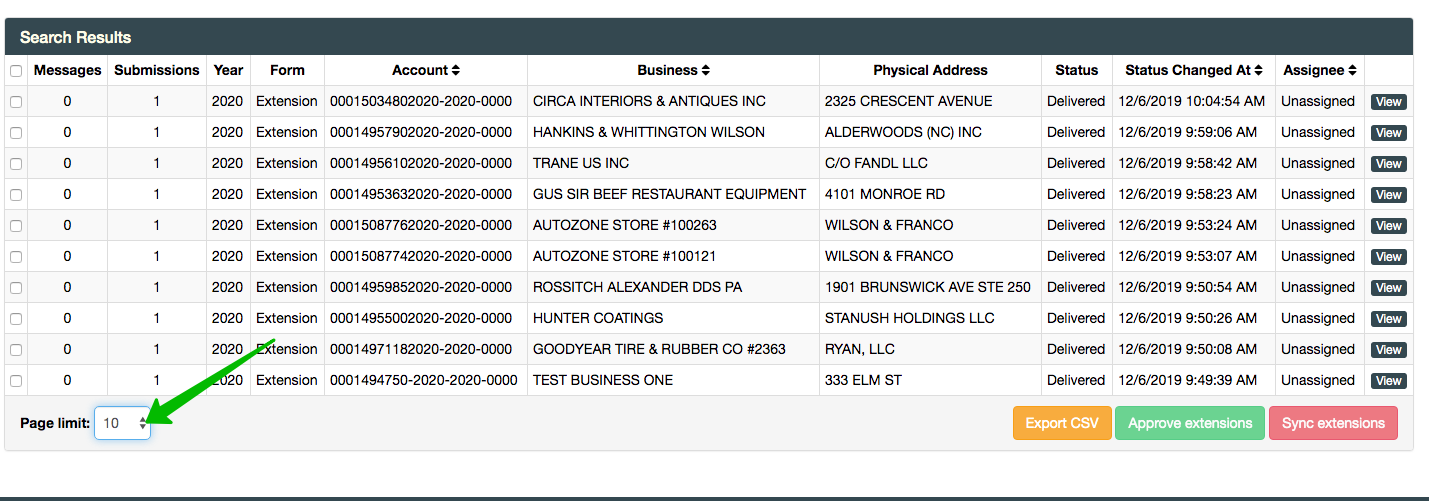
Use the "Page Limit" selector on the bottom left hand side of the screen to choose how many records to display at one time. The page limit defaults to 10 records. Choosing a large number of records may impact performance depending on how fast your internet connection is.
II. Sorting Options
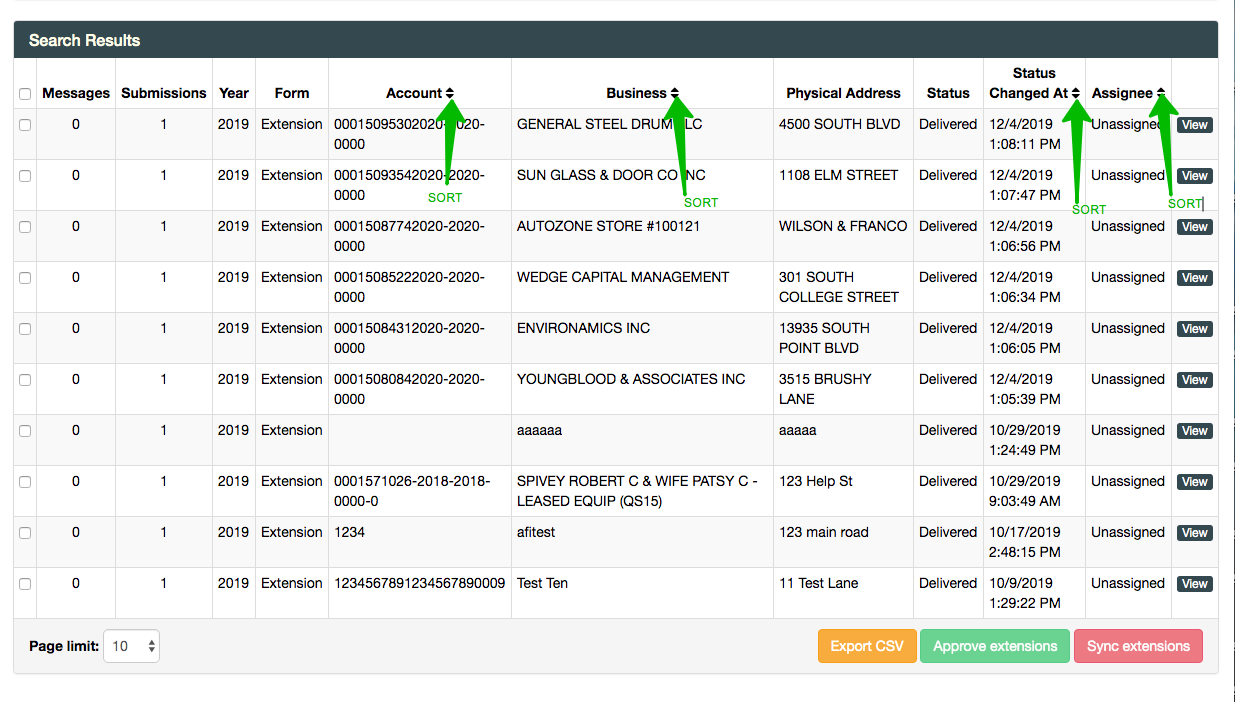
Search results can be sorted by Account number, Business name, Status Change Date and Assigned User. These sorts are independent - in other words, you may only sort by one data point at a time. To sort, click the icon next to the column header. An up arrow indicates that the column is sorted in ascending order (A-Z). Click again to sort descending (Z-A).
III. Export Search Results
After applying your search parameters, you have the ability to export the results to a .CSV file using the orange "Export to .CSV" button on the bottom right hand side of the search results grid. The export will include anything listed on the screen, as determined by the search parameters as well as the page limit. The check-boxes on the left hand side of the grid are not considered in the "Export to .CSV" button at this time.
Form Assignment
To review a form, click the 'view' button associated with any form in the search results grid. You'll then see all of the information that the taxpayer submitted through BizLink displayed on the page.
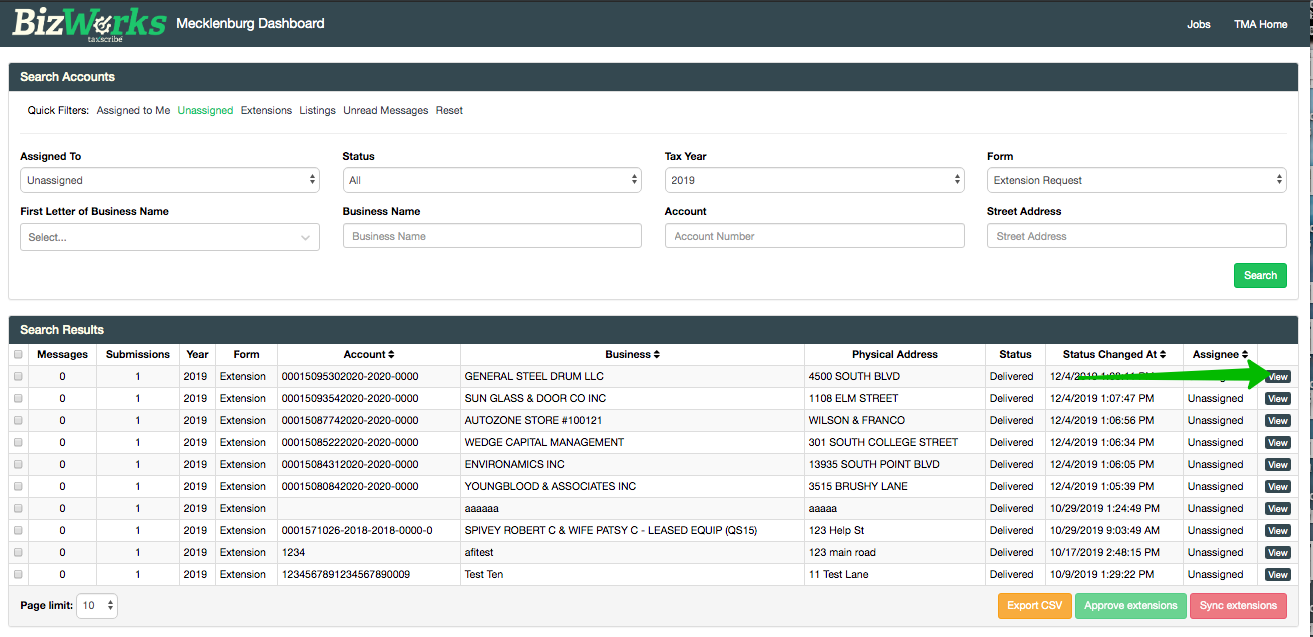
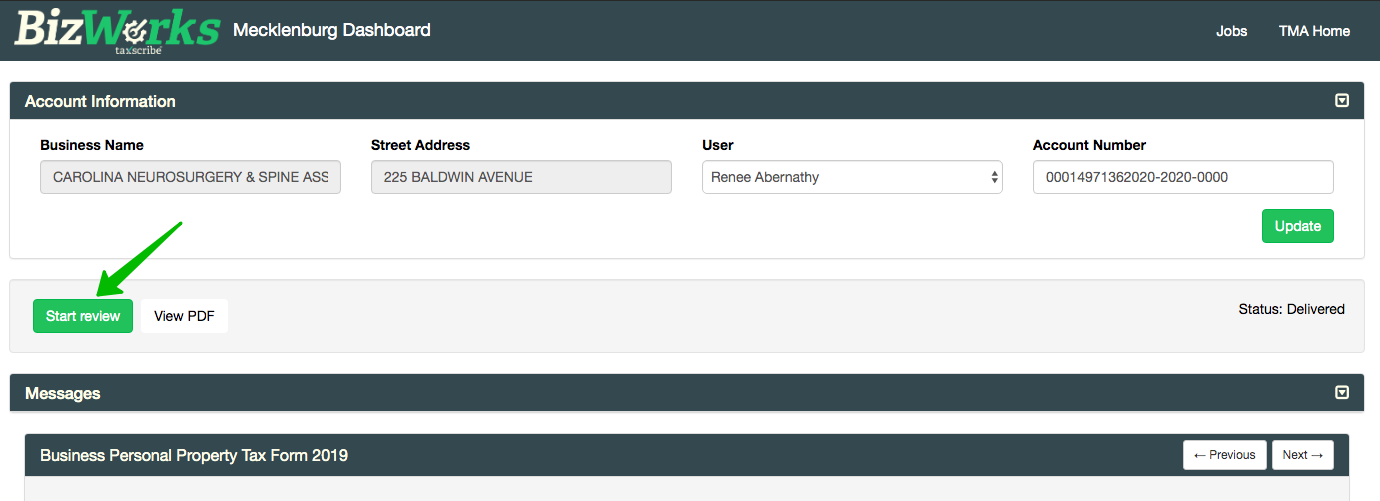
If the form is in a "delivered" status, click Start Review. This will automatically assign the form to you and move the status to "In Review". After clicking "Start Review", the tax payer will receive an email notification letting them know that their form is being processed. Other users can still view the form, but only the assigned user can approve or reject it.
Listings can also be assigned in bulk - see below.
Bulk Actions
I. Bulk Assign Listings
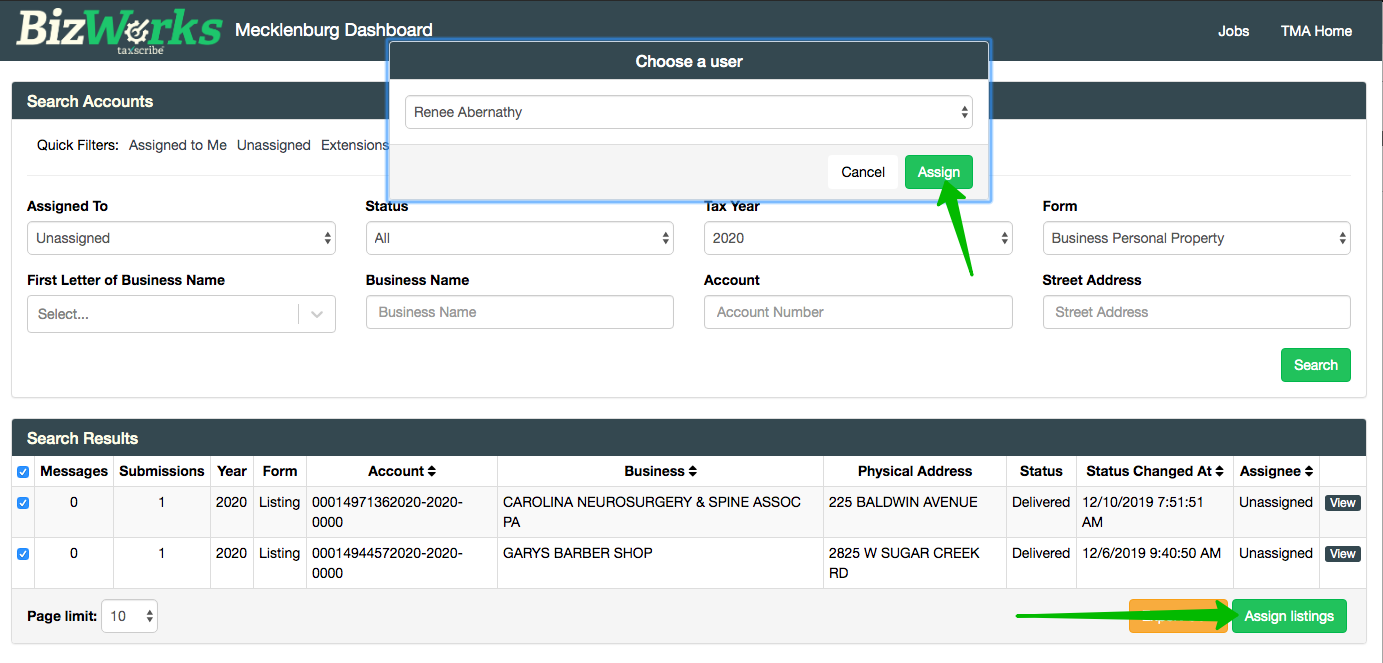
If the user has the "Bulk Assign Listings" permission enabled on their user profile, they will be able to assign multiple listings at once to themselves or others from the search dashboard. To perform a bulk assignment request, follow the steps below:
- Choose the listings you wish to bulk assign using the checkboxes on the left-hand side of the search results grid. Make sure the "Listings" quick filter is selected.
- Click the green "Assign Listings" button on the bottom right hand side of the search results grid
- Choose the user you wish to assign the listings to.
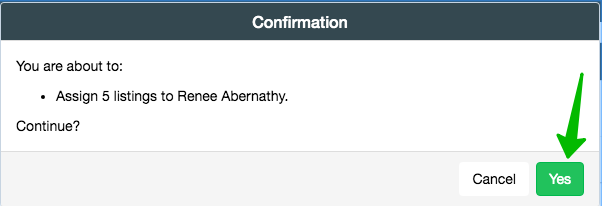
- Review the confirmation dialogue box summarizing the changes you are trying to make.
- If everything checks out, click "Yes". You'll then see a confirmation dialogue confirming the bulk assignment request was submitted.
II. Bulk Approve Extensions
If the user has the "Bulk Approve Extensions" permission enabled on their user profile,
They will be able to approve multiple extensions at once from the search dashboard. To perform a bulk approval request, follow the steps below:
- Choose the extensions you wish to bulk approve using the checkboxes on the left-hand side of the search results grid. Make sure the "Extensions" quick filter is selected.
- Click the green "Approve Extensions" button on the bottom right hand side of the search results grid
- Review the confirmation dialogue box summarizing the approvals. If the account number is not present the extension will not be eligible for approval and the confirmation dialogue box will indicate how many will be skipped.
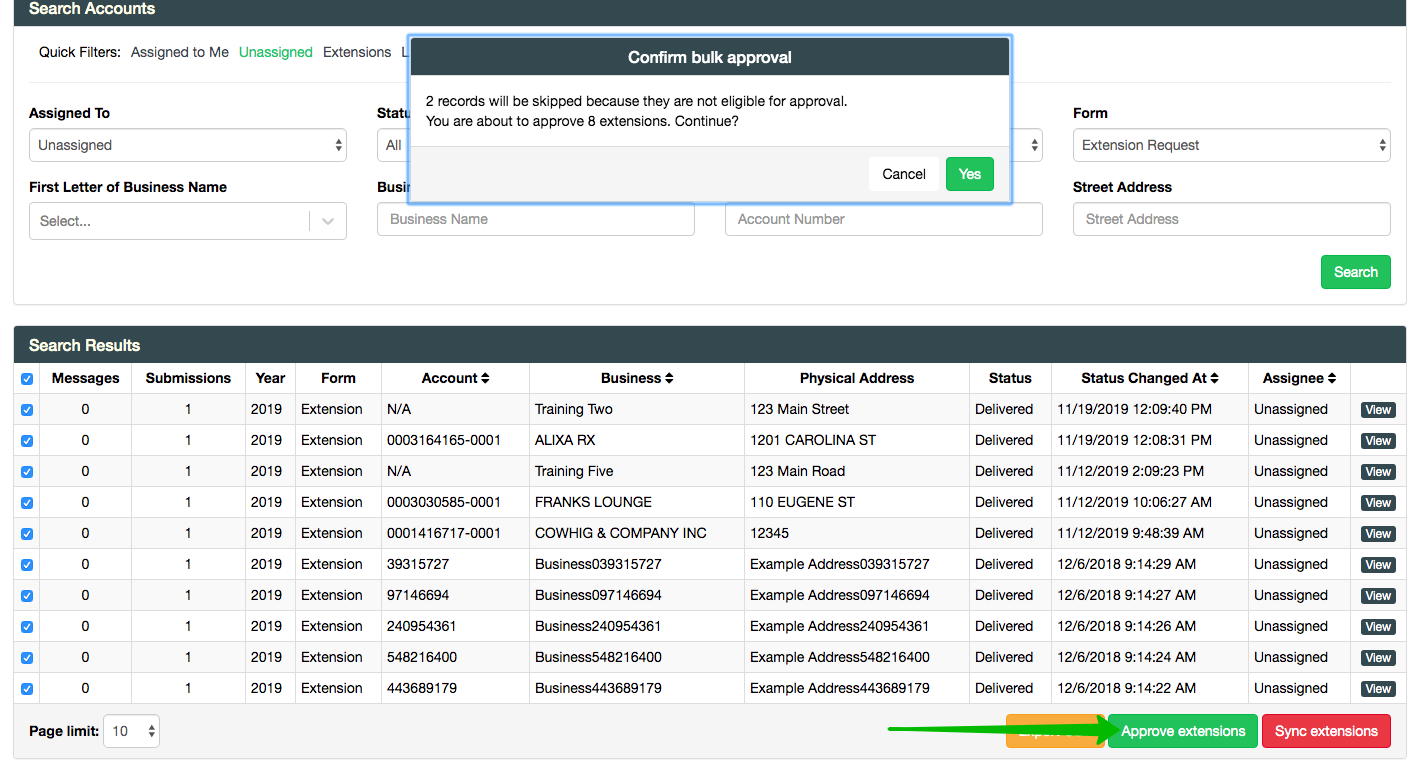
- If everything checks out click "Yes". You'll then see a confirmation dialogue box confirming that the bulk approval and the number approved and the number if any that were not eligible for approval.
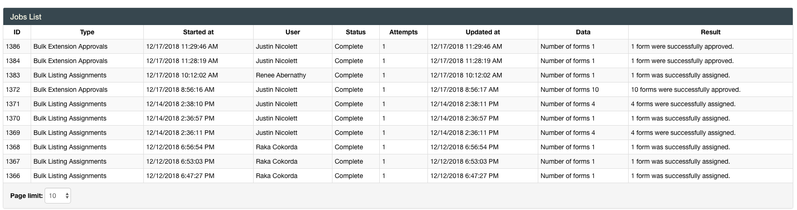
III. Bulk Jobs Page
After confirmation that the request was submitted, you can either close the dialogue box to continue working, or view the status of your request from the jobs page. The jobs page shows all of the active and completed bulk requests in chronological order, with the most recent on top. Activity from all users within your jurisdiction will show up here.
NCPTS Sync
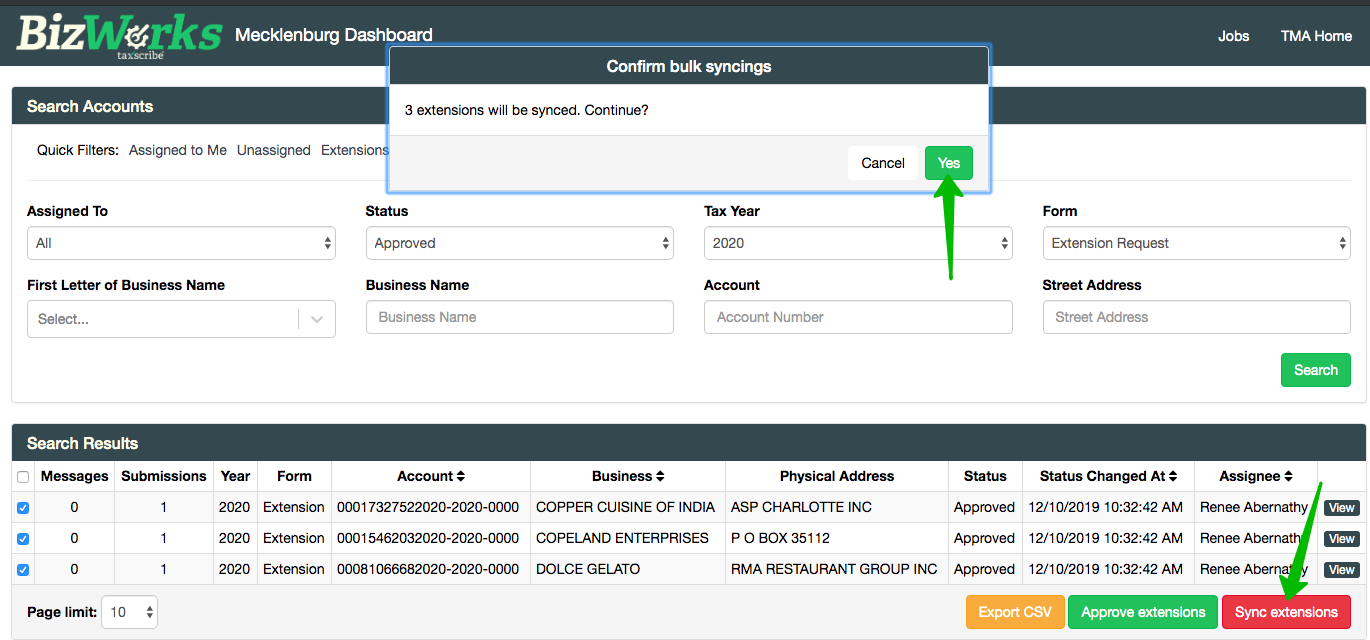
I. Extension Sync
Extensions may be synced individually or in bulk. In order to sync an extension it must be in approved status and have a valid account number. Select the box to the left that you want to sync, click on the red "sync extensions" tab in the bottom right hand corner. A confirmation box will pop up for you to confirm the bulk extension request or you can select close if you need to make a change.
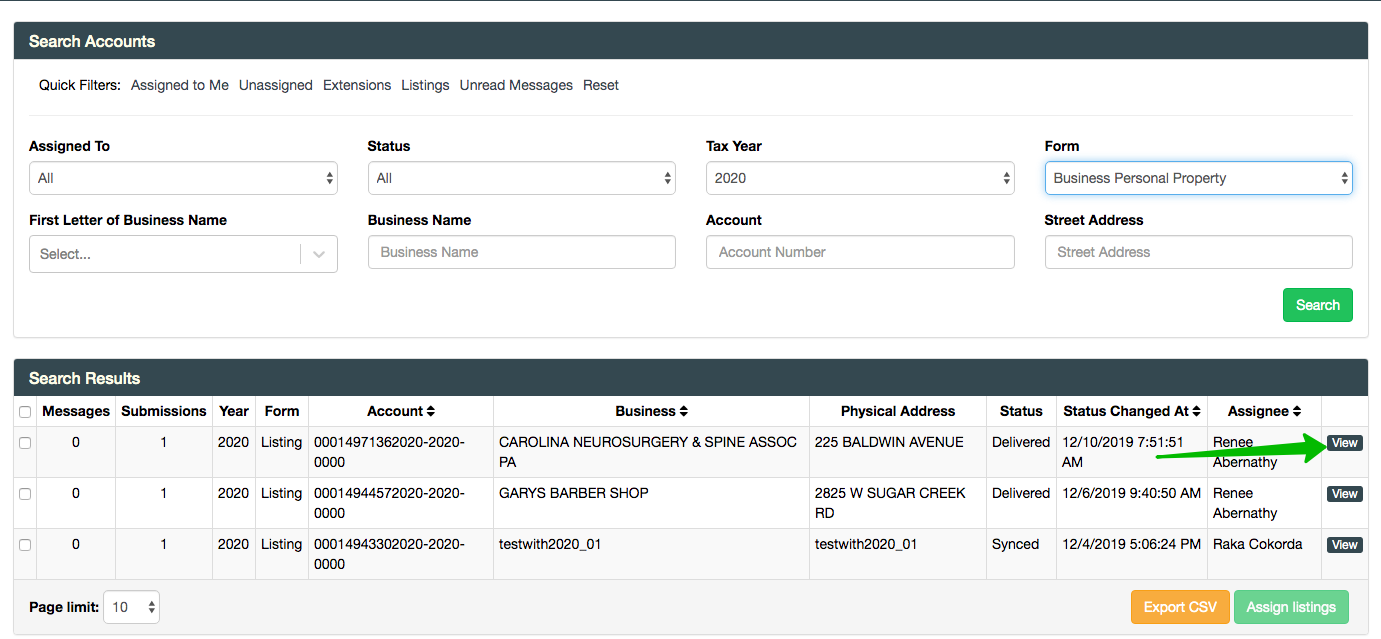
II. Listing Sync
The user can sync the listings one at a time. Select the listing you want to review by clicking on the "view" tab to the right of the business name.
Once you click on view you will be directed to the listing form. Select the green "Start Review" tab to start the review process.
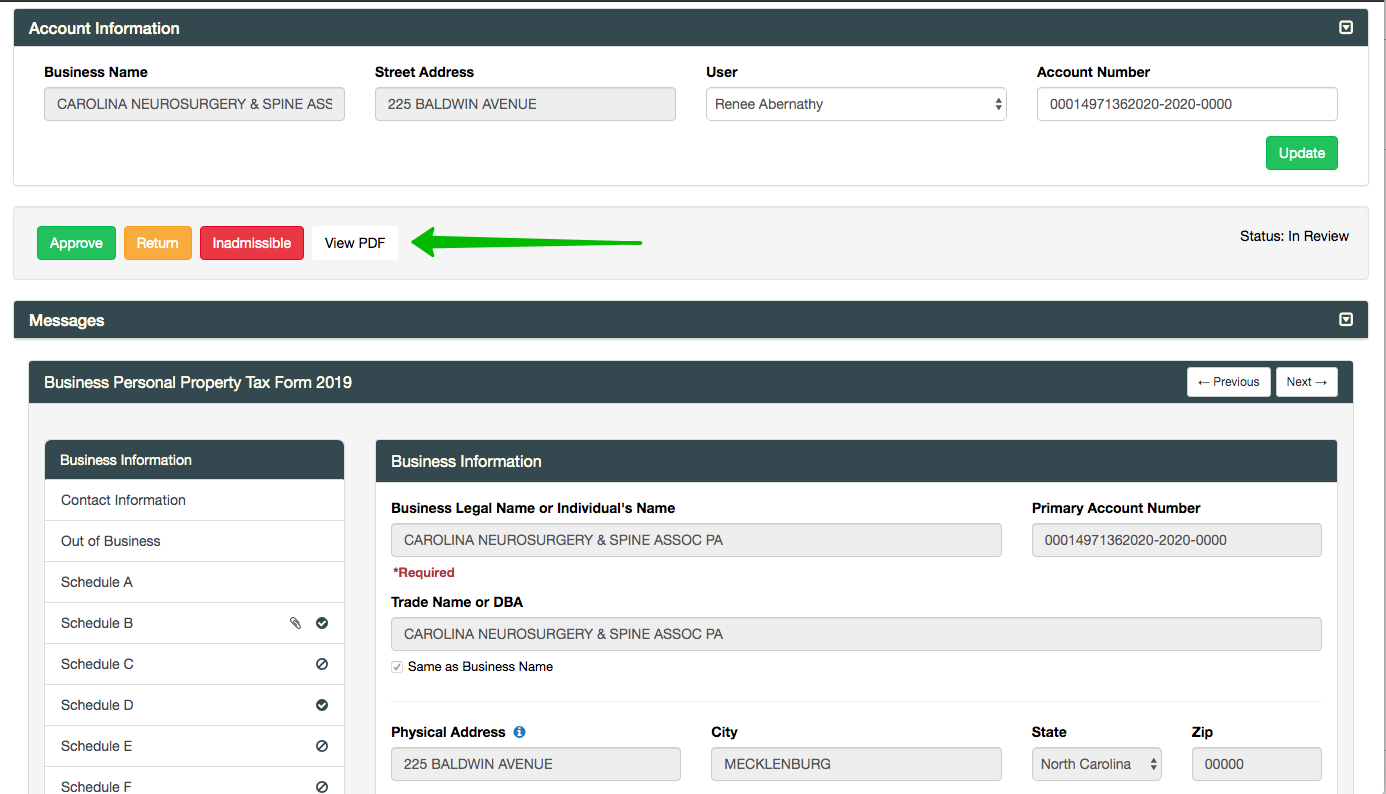
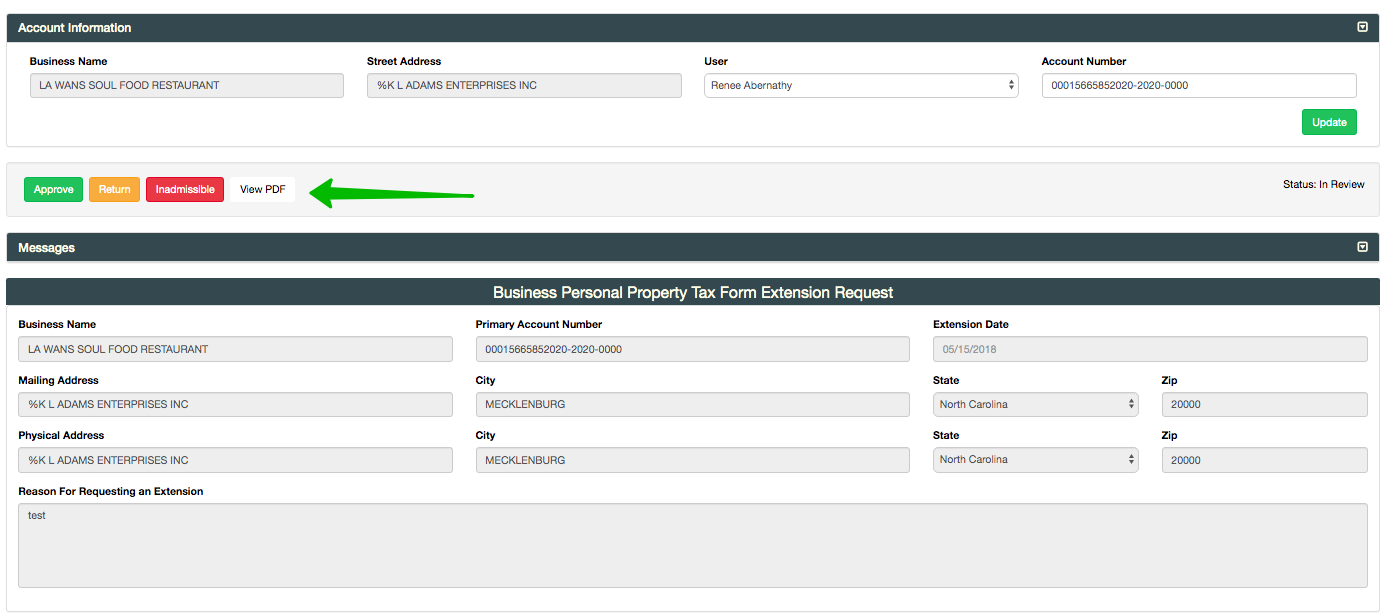
Once the review process begins the user has four actions to choose from, you can approve the form, return the form, say it is inadmissible, or view the pdf.
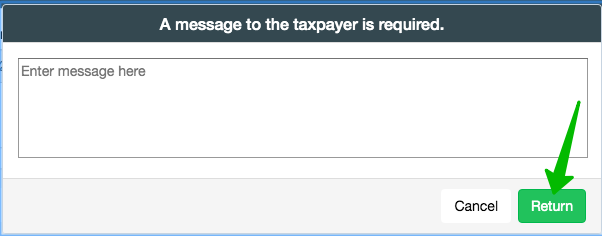
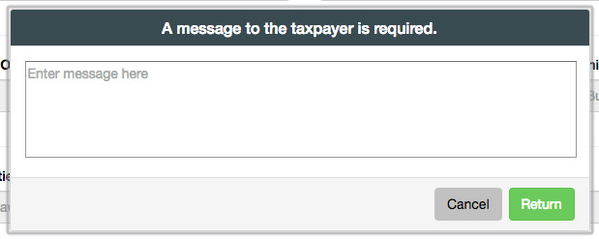
Once the form is reviewed it can be returned to the taxpayer with a message in the dialogue box and clicking the green "Return" tab.
Once the review process is complete and the form is approved the listing is ready to be synced. The status will update to approved and the red "sync" tab will be active. The listing will automatically update in NCPTS after the sync is complete.
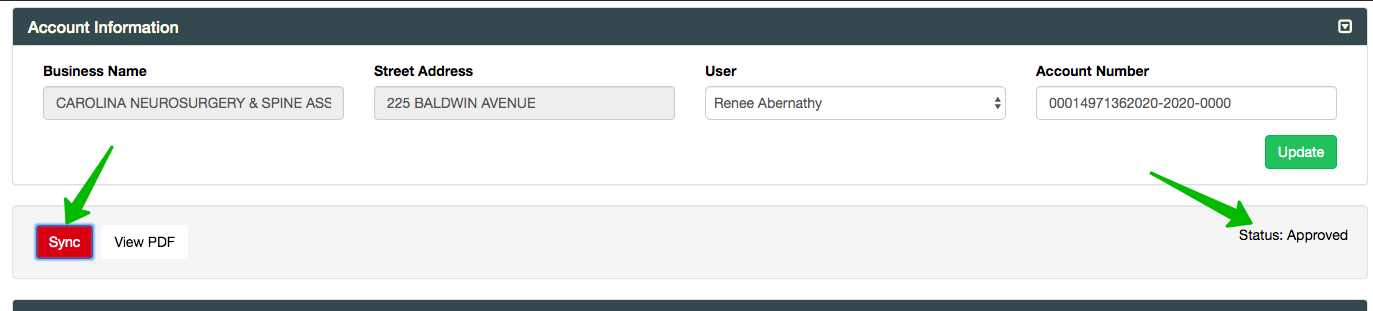
The status on the dashboard will show synced once the action is complete.
Form Views
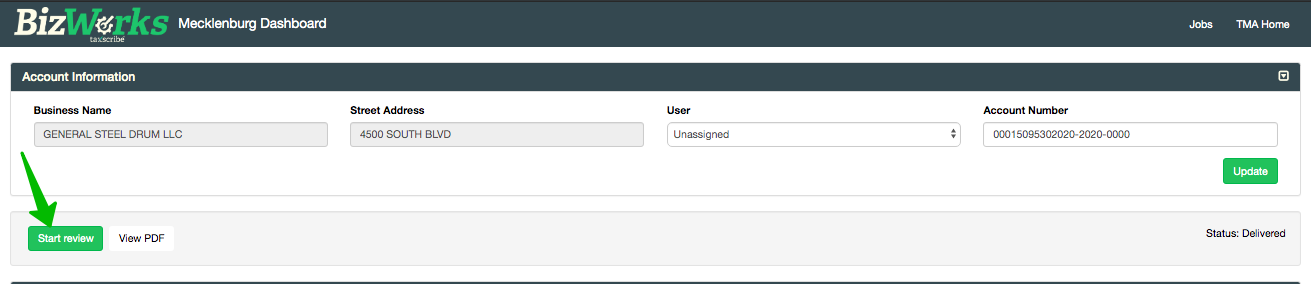
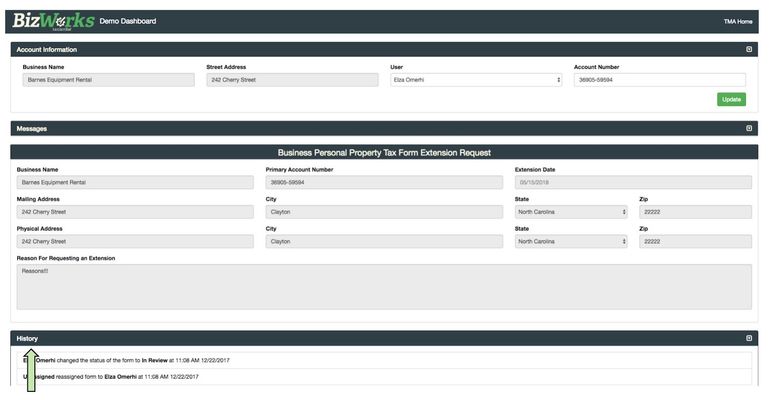
I. Account Information
The section at the top of the form details includes basic information about the tax payer, including Business Name, Street Address and account number. It will also include the county user assigned to review the form. If the Account Number is missing or is incorrect, you may update the account number by entering it in the header field. Click 'Update' to save the new information. You will receive a flash message, 'Account Updated' and an email notification will be sent to the person who submitted the form. To start the review process click on green "Start Review" tab.
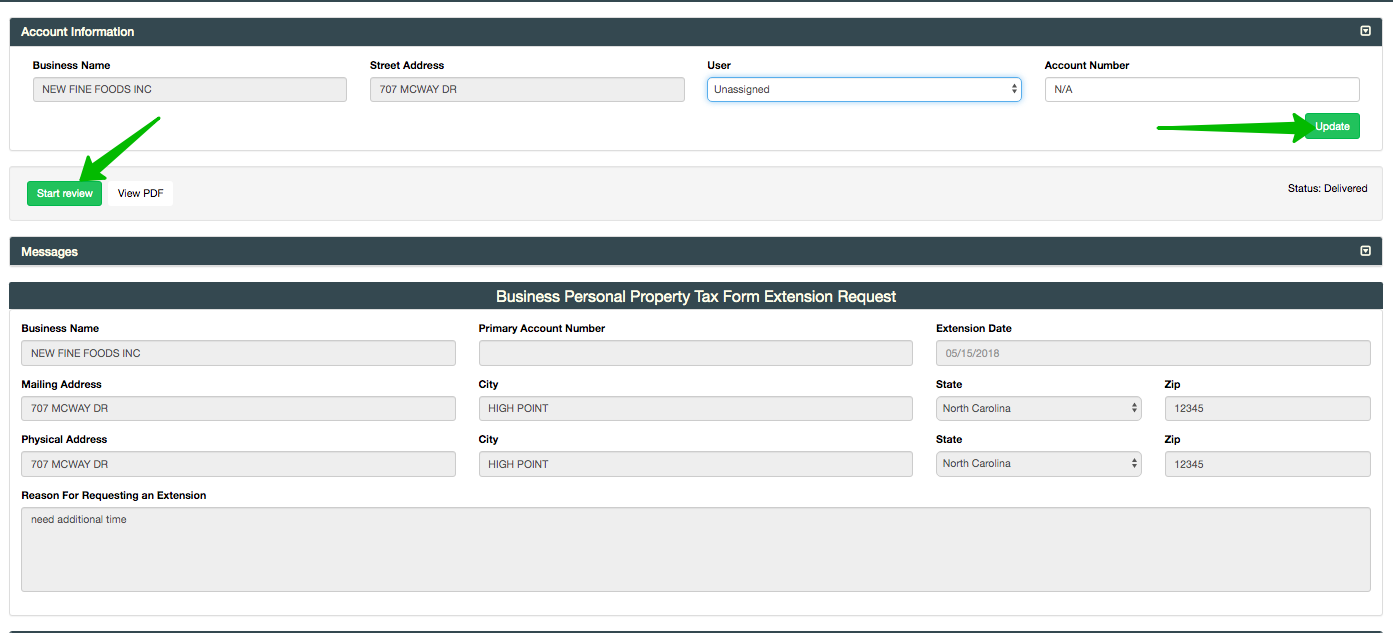
The form will be assigned to the person who starts the review process. The user will have the option to approve, return, mark as inadmissible, or view the pdf from this screen.
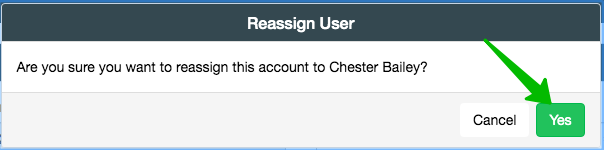
If you have administrative privileges, you may also change the user assigned to a form. Click the drop down for a list of users, then select the user you want to assign the form to.
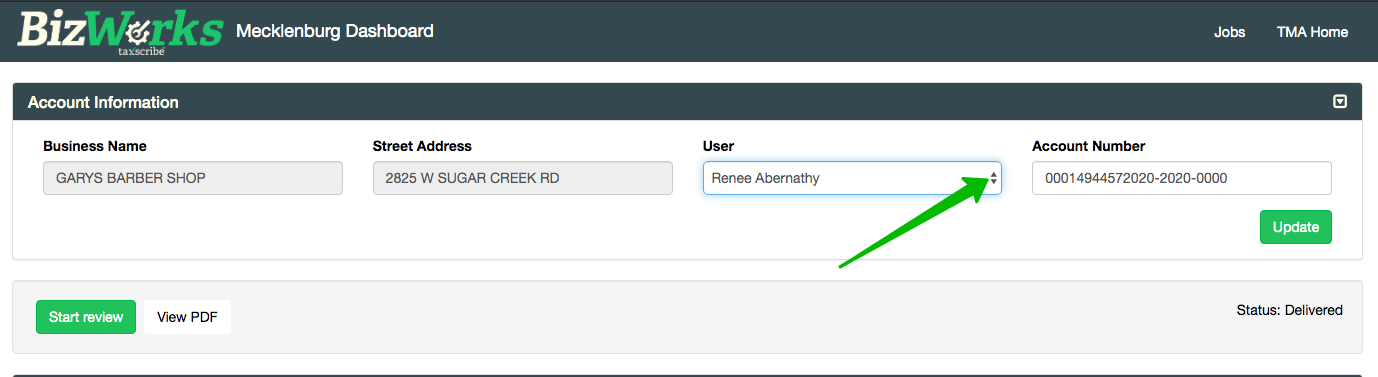
A window will confirm the reassignment. Select Yes to complete the process.
II. Communication Channel: Messages
At the top, in the header of each form is the Message section. To open the section, click the icon on the right. To close the section, simply click the icon again.
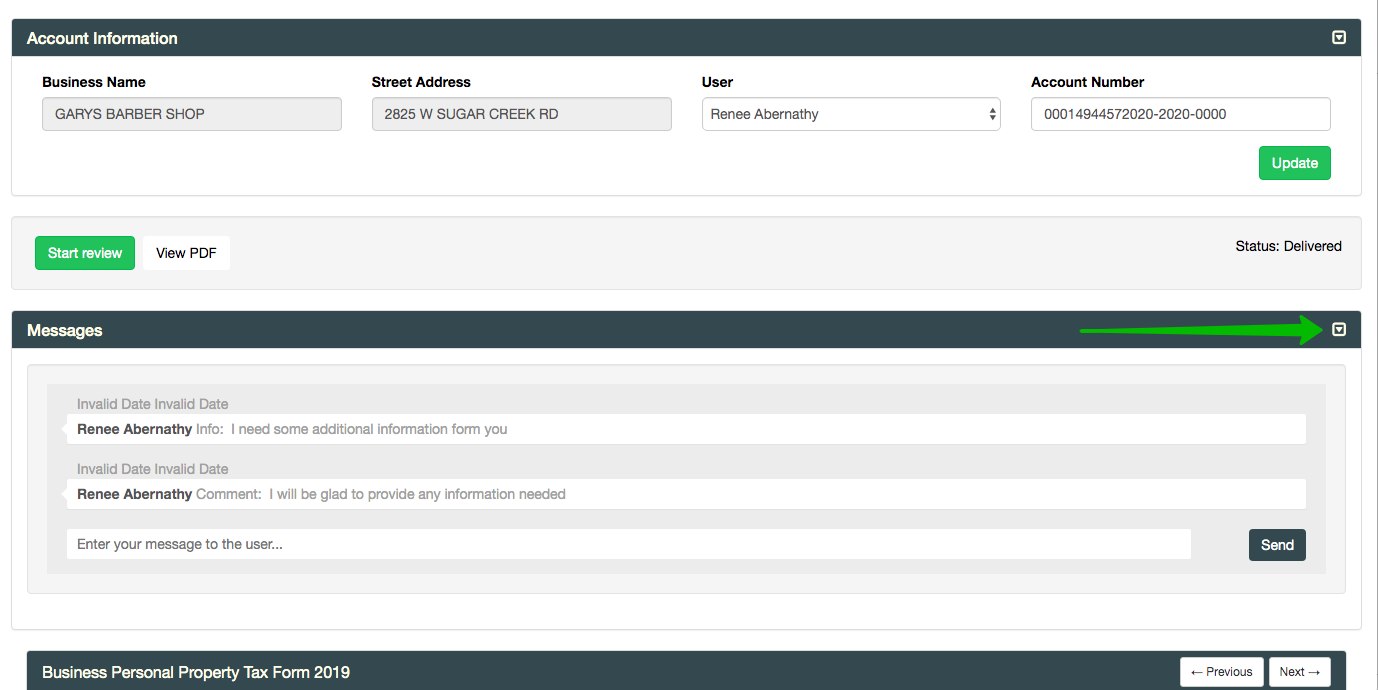
Within the messages section you can send a message to the taxpayer and see a full history of all messages related to that submission. For example, if a form had been returned and resubmitted, you can see why it was returned and ensure that the issue with the original submission has been addressed. The count of unread messages appears on the first column of the "search results" section on the BizWork Dashboard. There is also an "unread messages" quick filter, which will display records with 1 or more unread messages.
III. Form Review
i. Form Sections
The online screens mirror the NC Department of Revenue Business Personal Property listing form. Clicking the section will allow you to view and assess its contents.
ii. Listing Indicators
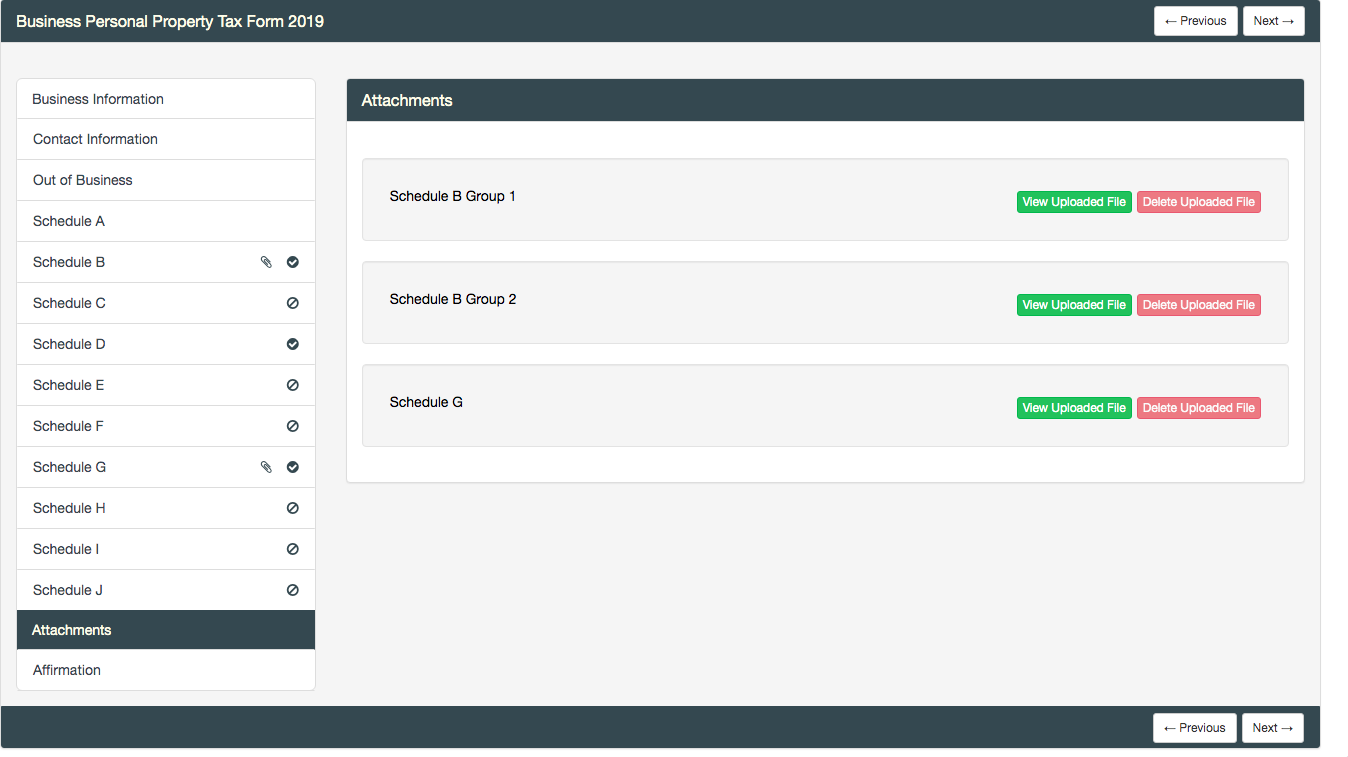
On the listing Form, Schedules B through J include a completion indicator. If the section was not answered at all, there will be an empty circle. If the section was answered with all No's, there will be a circle with a slash. If the section was answered otherwise, there will be a check indicator. There is also a paperclip to indicate if there are any attachments in a section.
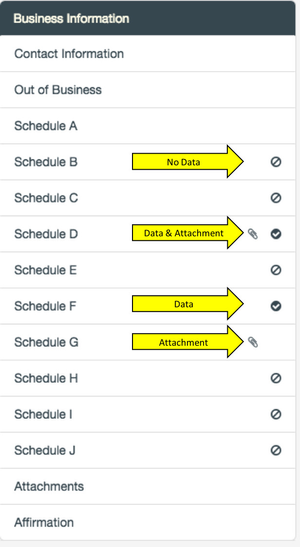
iii. Attachments
All schedule attachments and any additional attachments can be accessed by selecting the Attachments section. Depending on your computer and the file type, View Uploaded File will show you the file in a new window or download the file to your computer.
iii. Approve, Return, Inadmissible
At the bottom in the footer of each form are buttons to Approve the form, Return the form, or mark the form as Inadmissible. When selected, each button will update the forms status.
- Approve: Used when no further information is required from the tax payer. An automated approval message is sent to the taxpayer via the TaxScribe communication channel as well as by email. Status updates to "Approved"
- Return: Used when additional information is required from the tax payer. A taxpayer may edit and resubmit a form which was returned to them. A message from the user returning the form is required, which will be sent through the TaxScribe communication channel as well as by email. Status updates to "Returned"
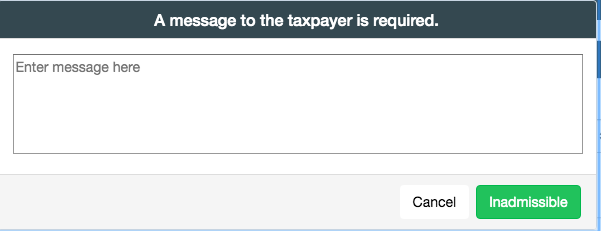
- Inadmissible: Used when the form is denied. The taxpayer cannot edit the form and resubmit the form, but it does not prevent the taxpayer from creating a new form for the same account. A message from the user rejecting the form is required, which will be sent through the TaxScribe communication channel as well as by email. Status updates to "Inadmissible
- Once Approved, Returned, or Inadmissible, the submission is no longer editable.
IV. Change Log
A log of change(s) made is displayed in the history section under the form details:
BizWorks Instructional Videos
Extension Demo
- Walkthrough on how to process extensions
Dashboard Overview
- Walkthrough of the county Dashboard
Listing Demo
- Walkthrough on how to submit a listing