BizLink User's Guide
Registration
Click on Register to create an account.
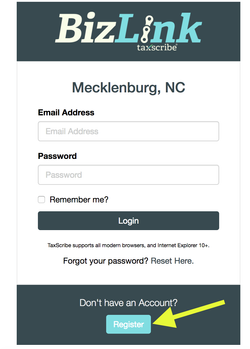
Enter the required information and click 'Create Account' to begin the registration process. You will receive an email with a login link to complete the registration process. If you do not receive the email within a few minutes, check your spam folder. If not there, you can repeat the registration process or request a new password using the 'Forgot Password' function.
Your e-mail and password are used for all jurisdictions using BizLink, so you only need one account for multiple jurisdictions.

Resetting Your Password
If you forget your password, you will be able to reset it yourself using the following steps:
- The user should click the "Reset Here" Link on the login page

- This will prompt the user to enter their email address (enter the email address that was initially used to register the account)
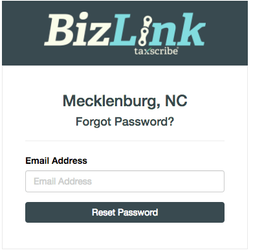
- Click reset password after entering email address, this sends a link to the email address entered
- Clicking the emailed link will redirect the user to the the reset password page where a new password can be entered and saved (minimum 6 characters)
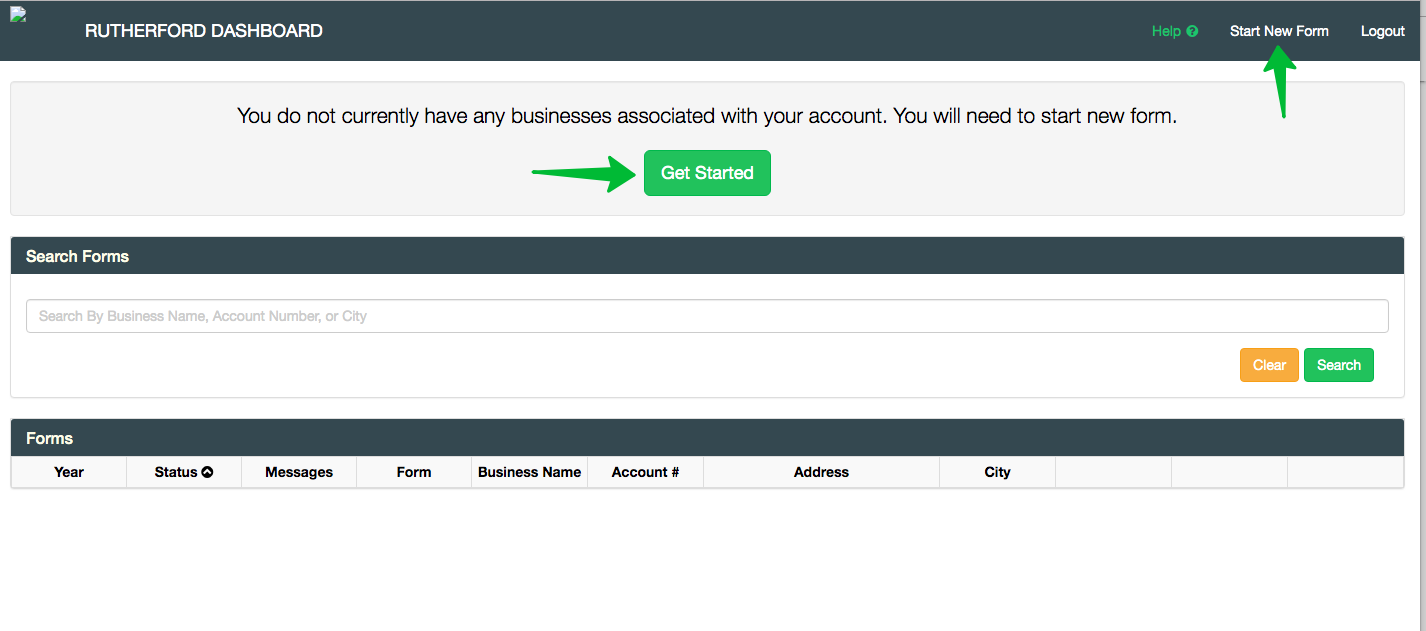
Getting Started
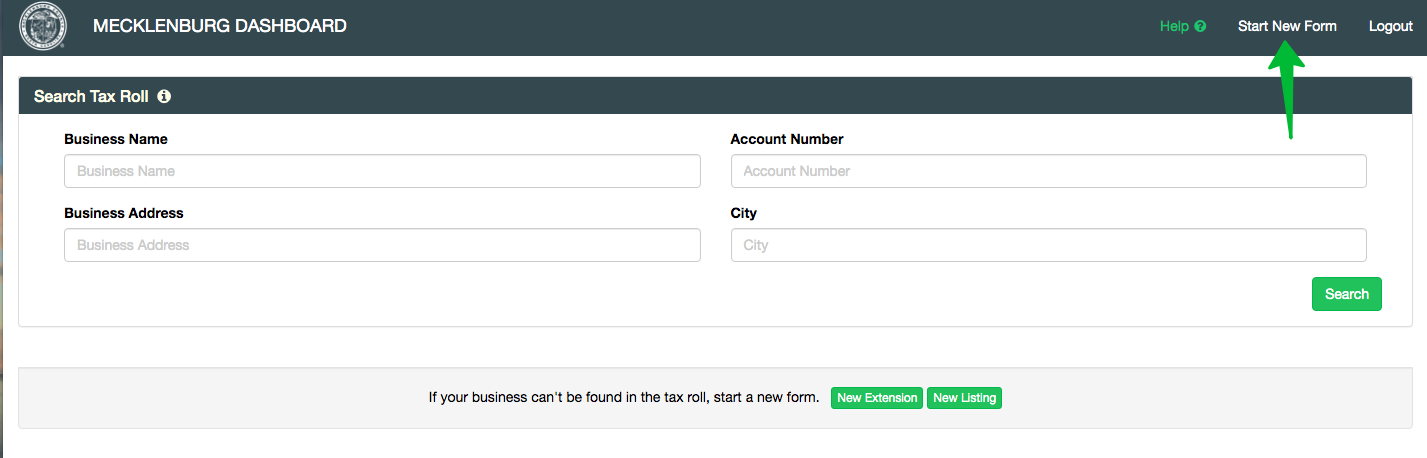
On your first login, the Dashboard will show that you have no forms / businesses available. Click the green 'Get Started' or 'Start New Form' to begin.
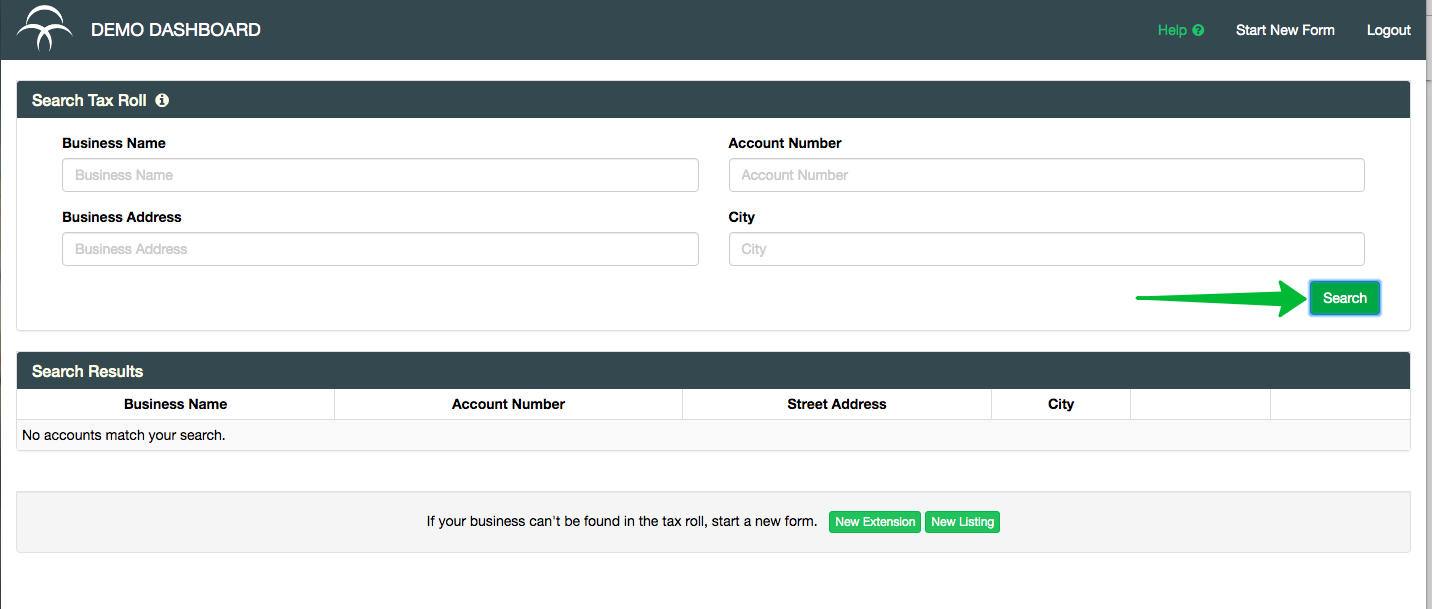
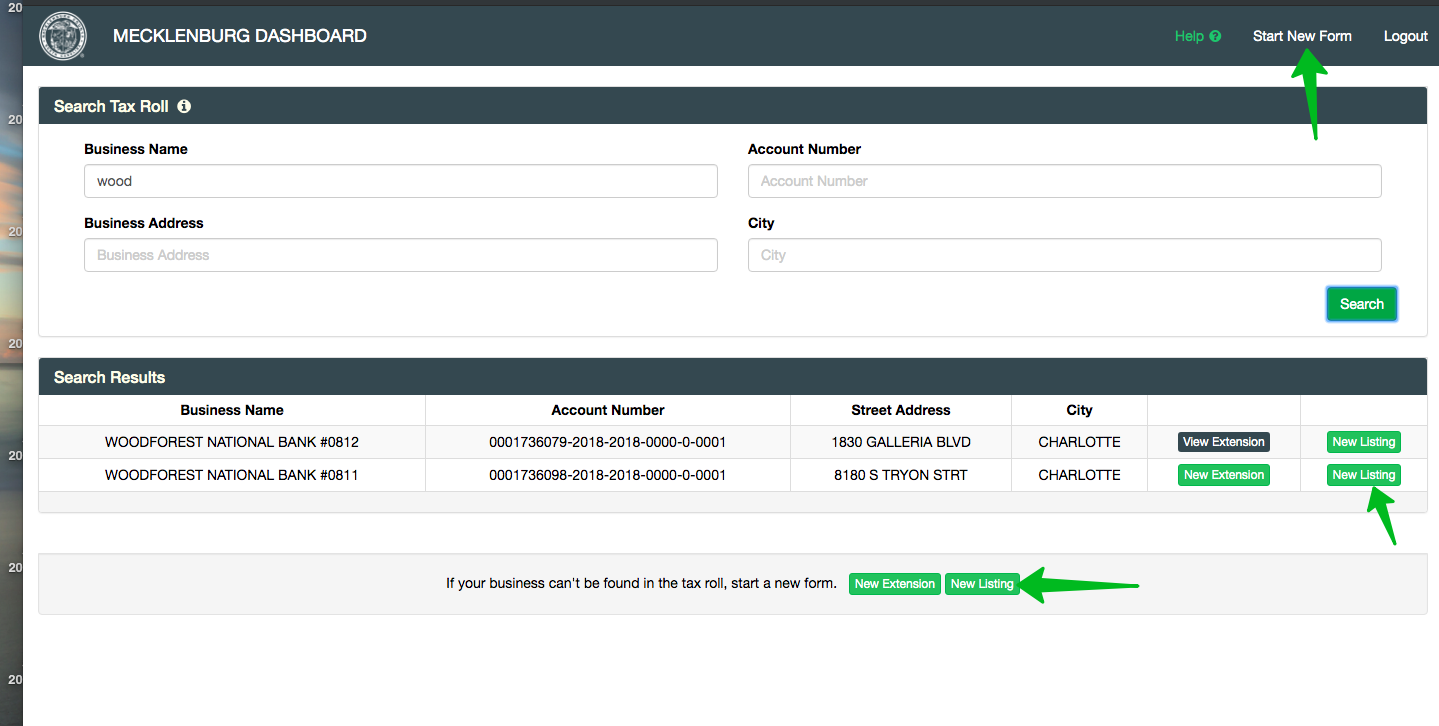
Tax Roll Search
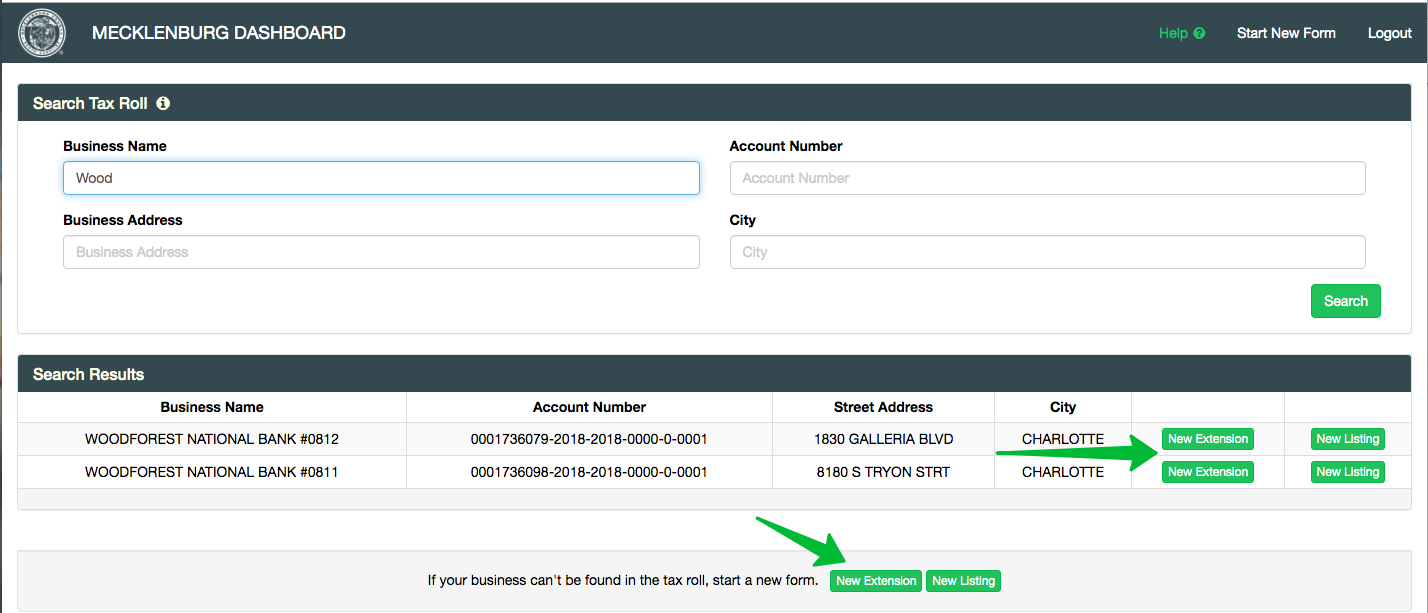
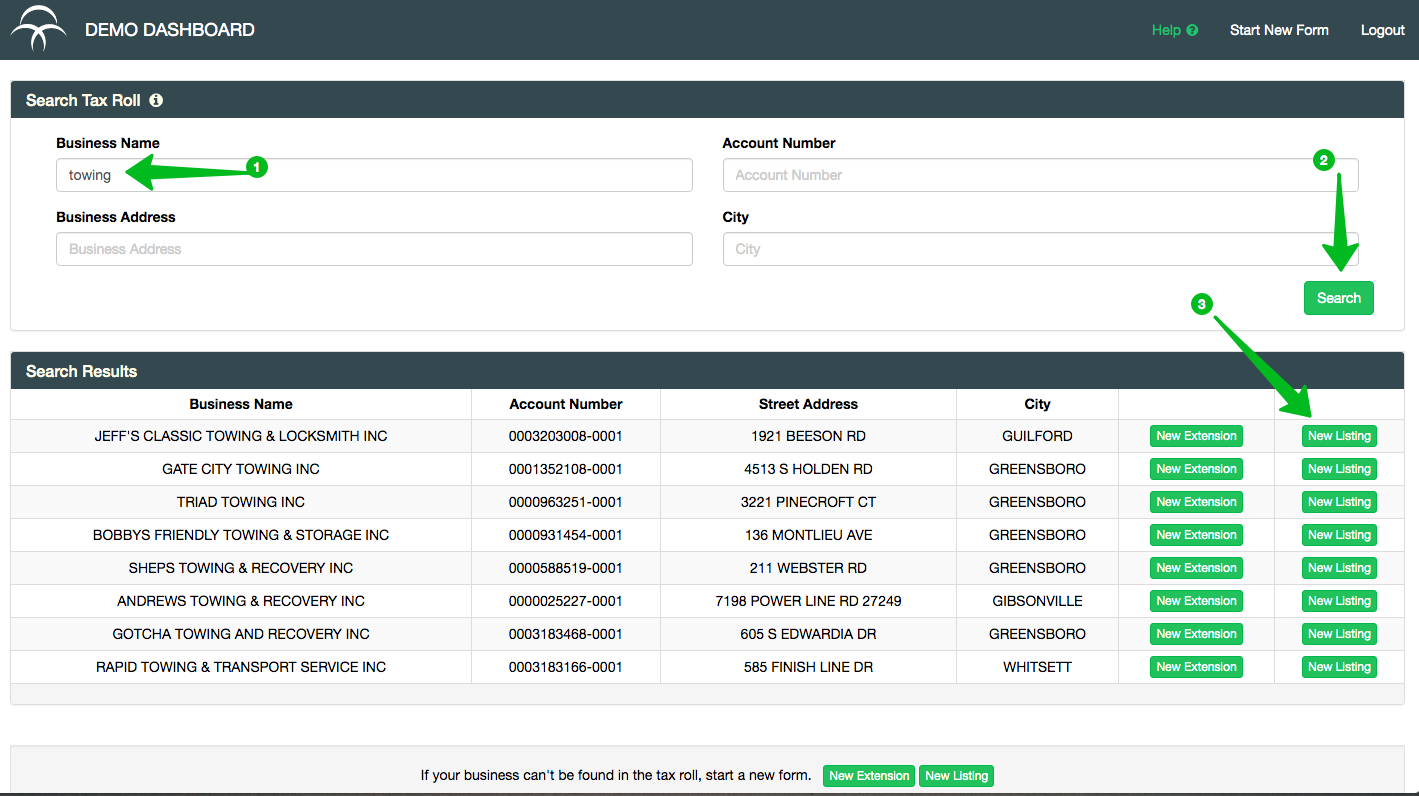
Jurisdictions have provided basic information from which either a Business Personal Property Listing or Extension may be started: Business Name, Address, Account or Abstract number. This information comes from prior year's filings. Click on "Start New Form" at the top of the dashboard. It is recommended that you search by part of the business name, but any field may be used. Enter the information, then click 'Search'.
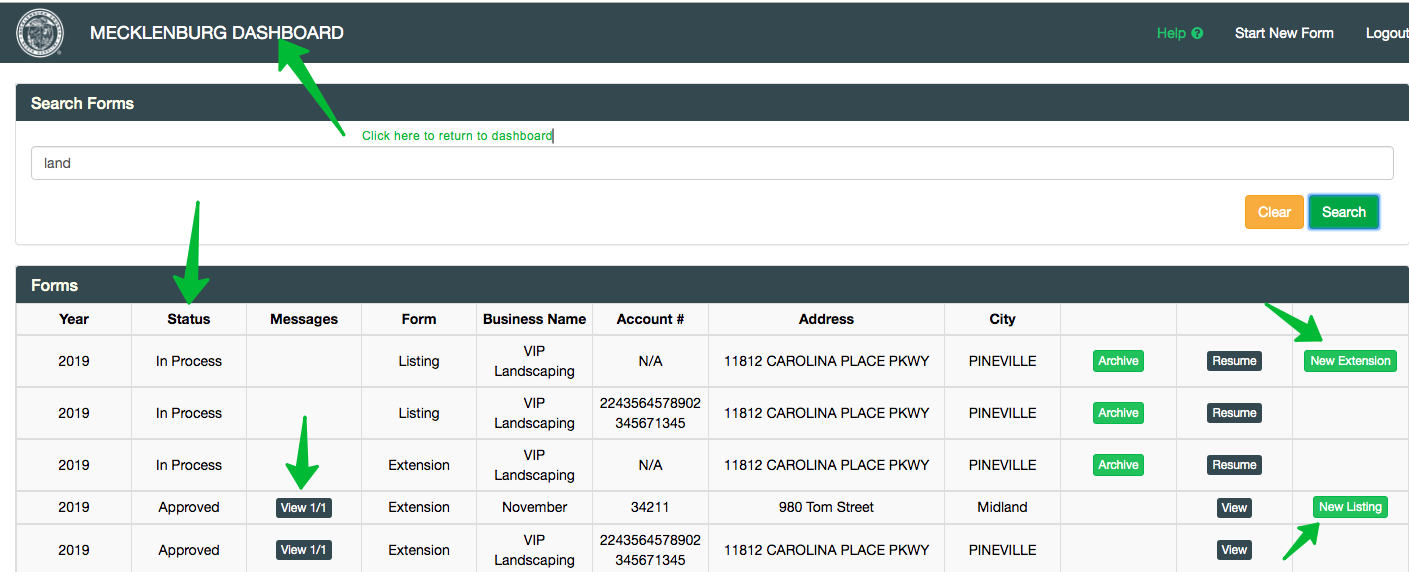
Searching For Previous Record
Users can also search for Previous year’s record using the “Search Forms” link on the dashboard
Click "Start New Form" allows users to search by: Business Name, Account Primary Number, or Business Address
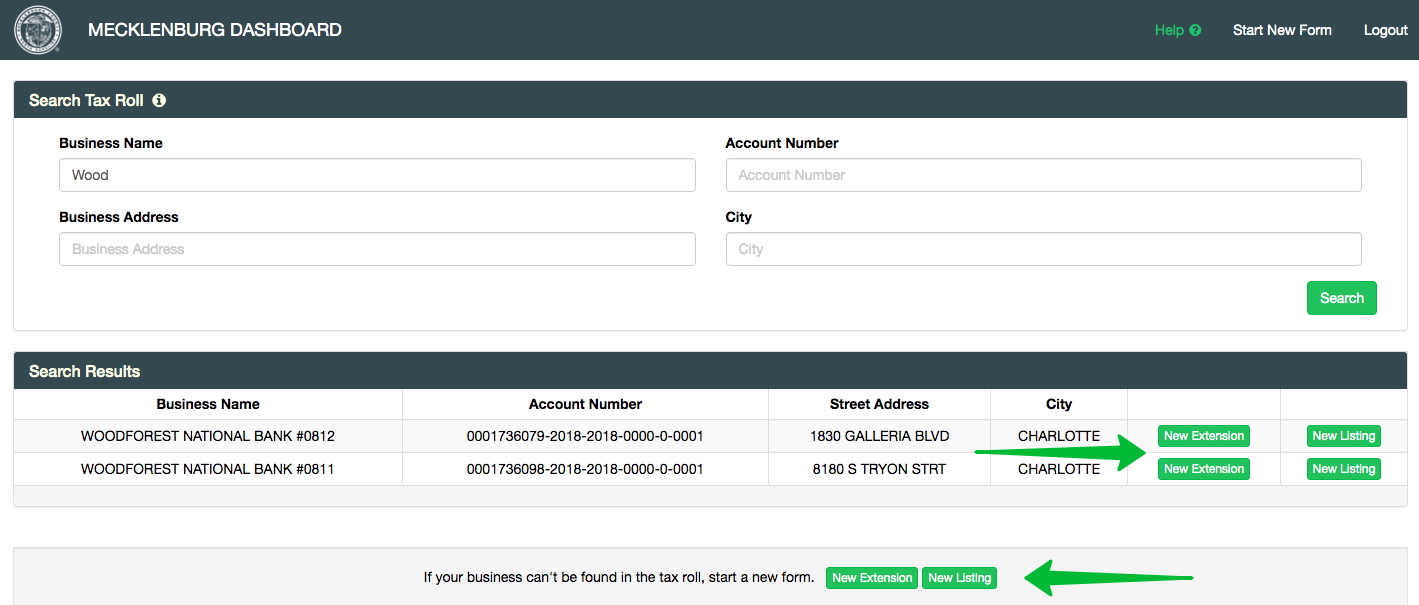
Search Results, Starting a Form
If the search results include the business you are looking for, begin a form using the 'New Extension' or 'New Listing' button on that business's row. This will pre populate the name, address and account information provided by the Jurisdiction. If the business you are looking for is not listed, start a blank form using one of the buttons at the bottom of the list.
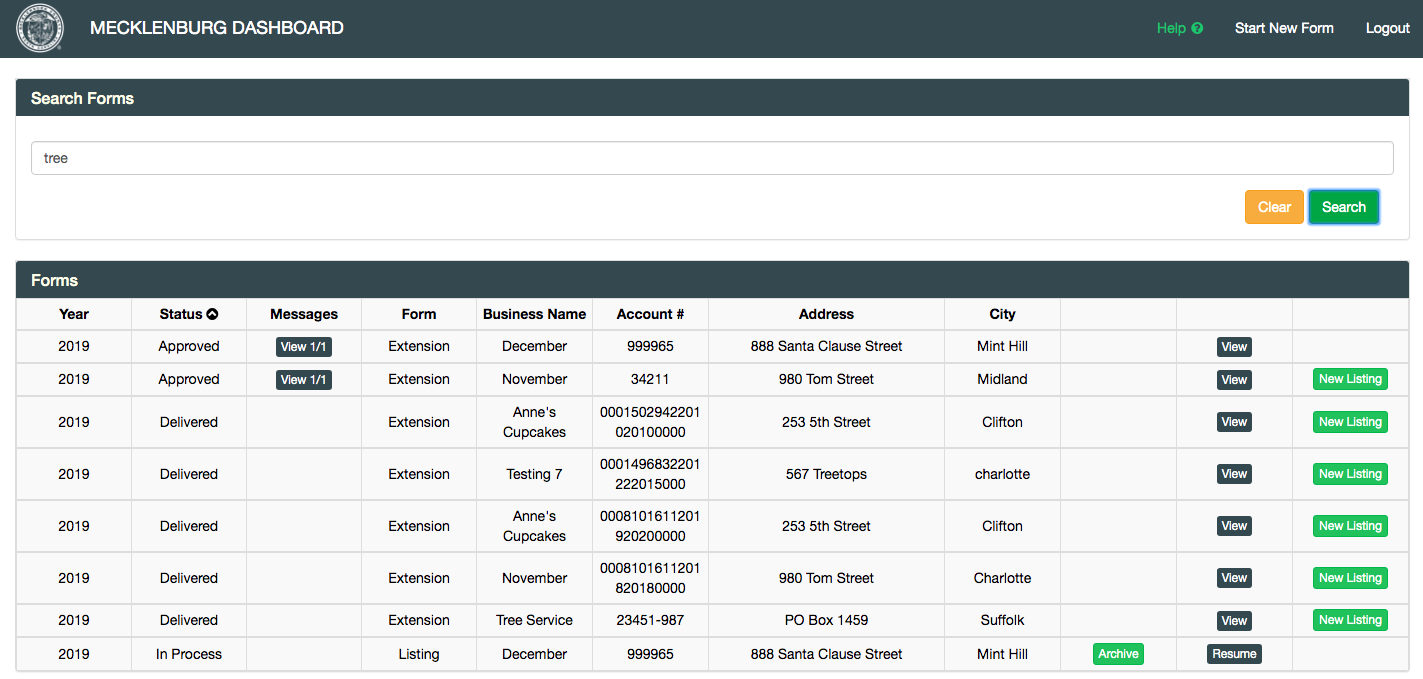
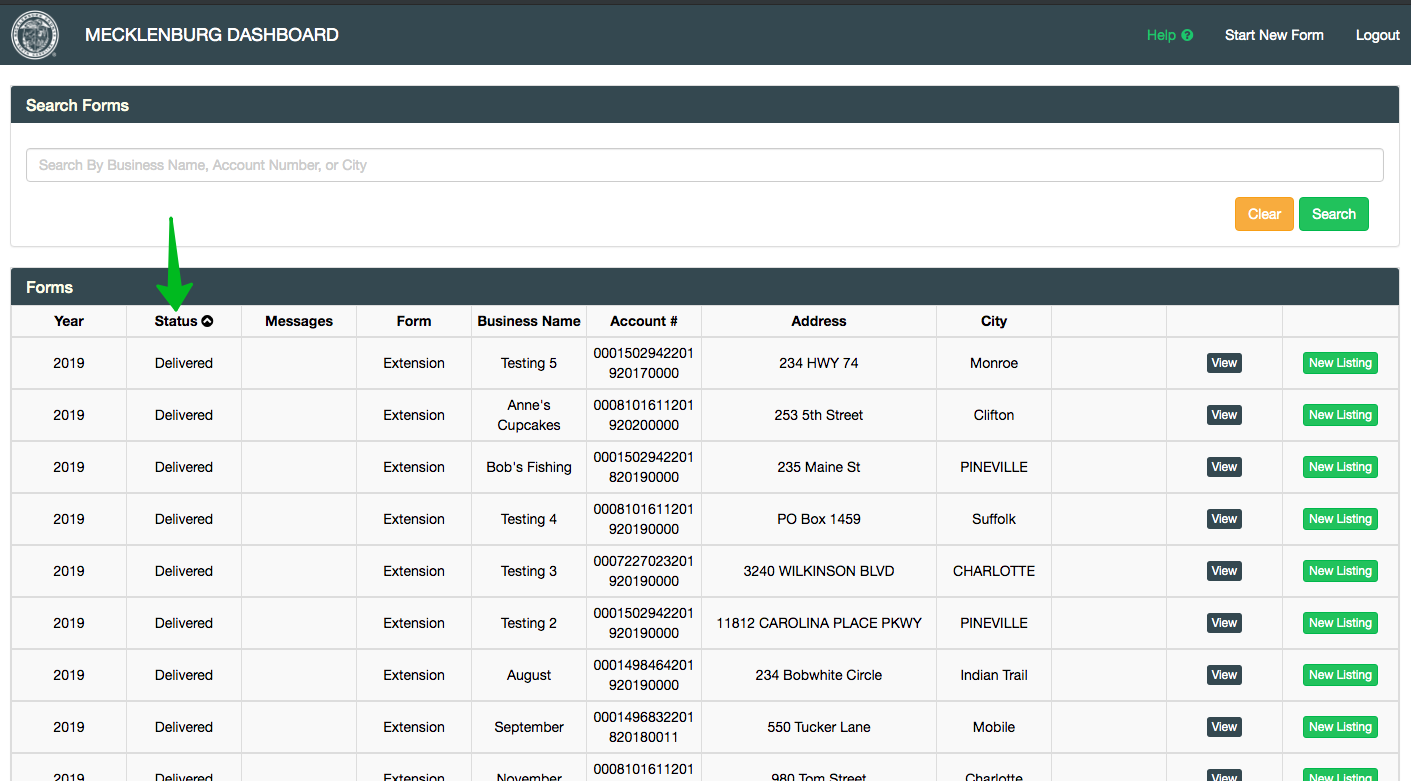
Dashboard
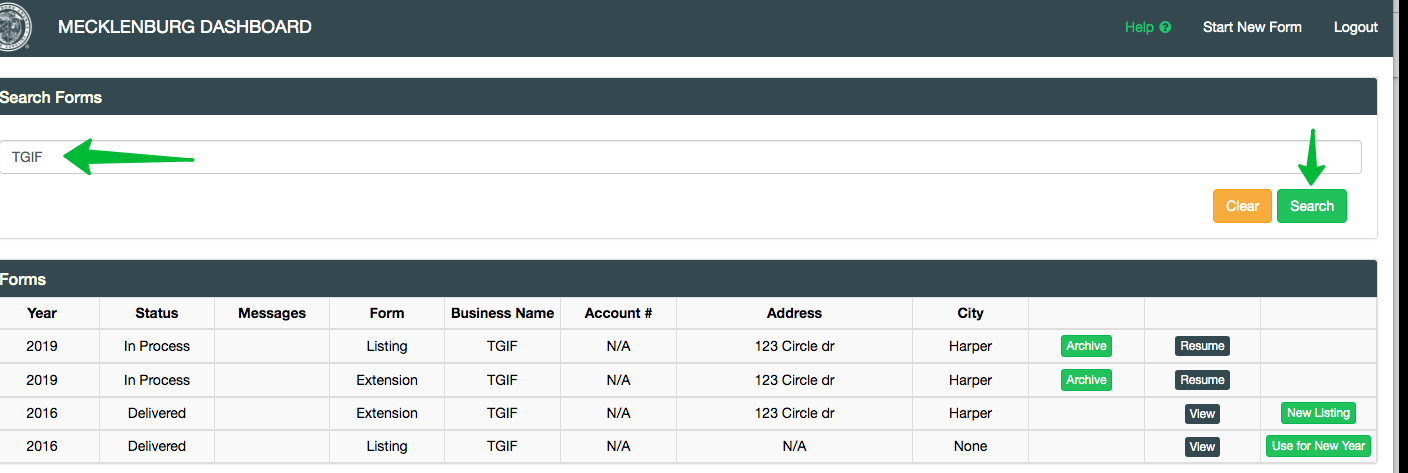
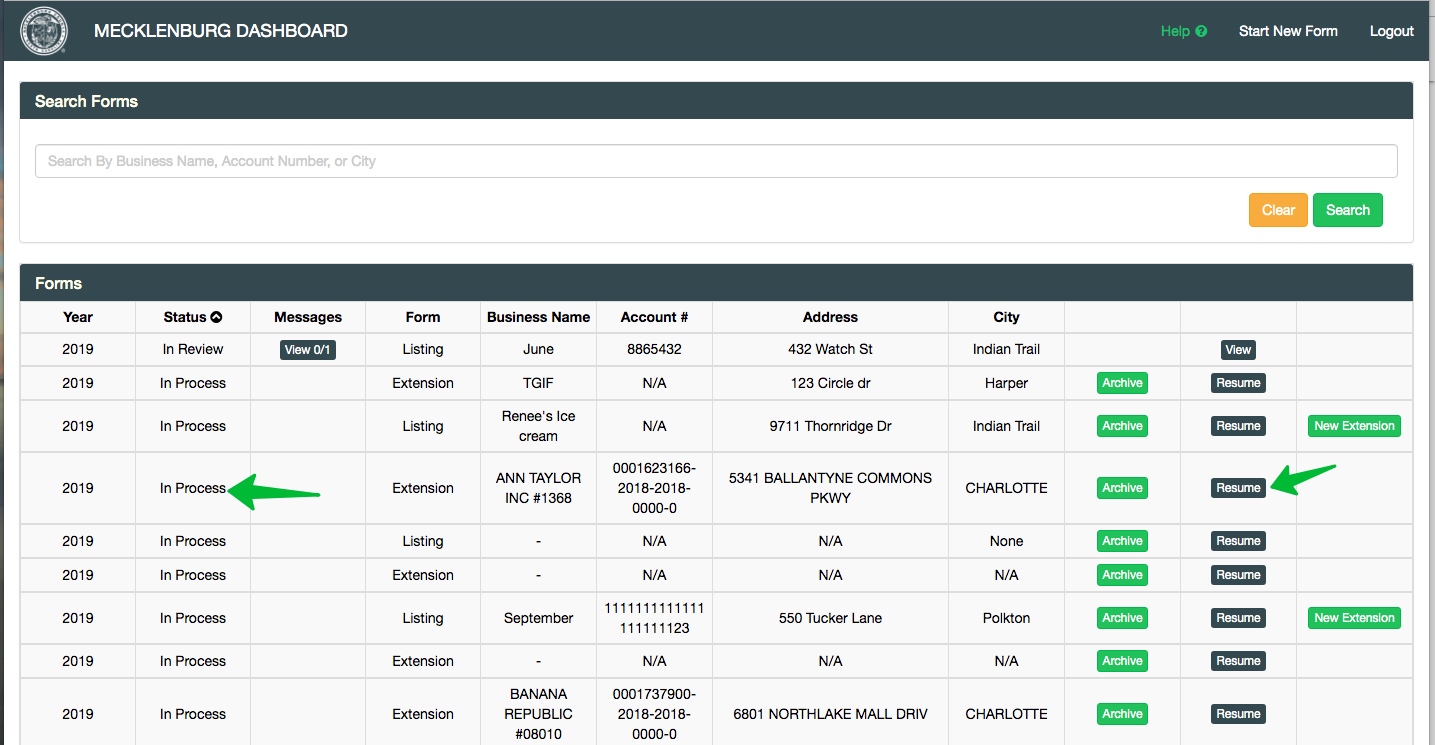
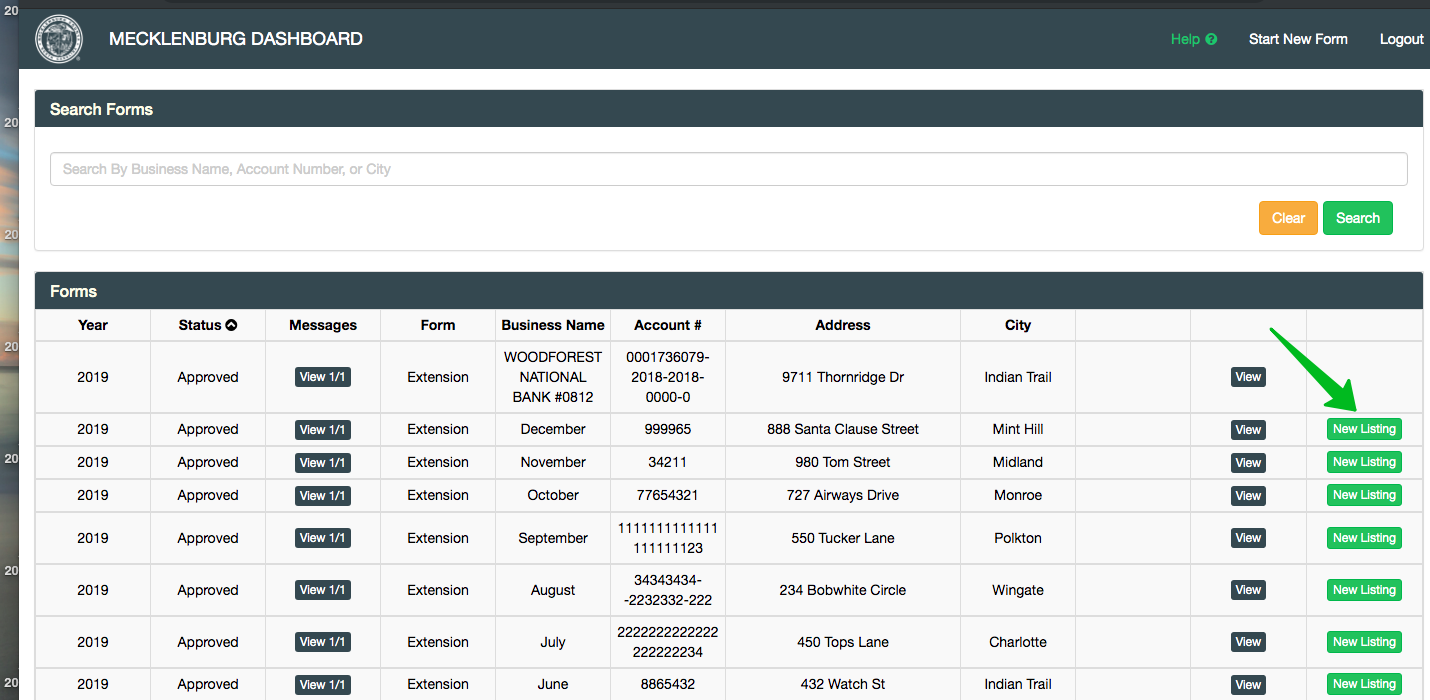
Once you have started a form or have multiple forms, your Dashboard will show you a comprehensive view of your forms. The view includes the status of each form and whether or not there is a message for the form. You can also start additional forms related to a business depending on the type and status of a form in process. For example, if you have already submitted an Extension Request, a green button to start a Listing form will be available. To return to the dashboard at any time click the Dashboard name or picture in the upper left hand corner.
Status Definitions, Form Actions
| Status | Meaning | Action Allowed |
|---|---|---|
| In Process | The form is started, but has not be submitted to your taxing jurisdiction | Use the Resume button to pick up where you left off |
| Returned | The form has been sent back to you for additional information / clarification by your taxing jurisdiction The jurisdiction will have provided details on why the form was returned in the accompanying message | Use the Edit button to make changes and resubmit |
| In Review | The jurisdiction has opened your form and is going over it for approval | You may only view the form, no changes are allowed |
| Delivered | The form has been sent to the jurisdiction, but it has not yet been opened | You may only view the form, no changes are allowed |
| Approved | The form was approved, no further action is needed | You may only view the form, no changes are allowed |
| Inadmissible | You may not use BizLink to submit your form. The jurisdiction will have provided details on why the form cannot be processed online. | You may only view the form, no changes are allowed |
Message Indicators
If there is a message, the form will display a 'View' button under the message tab. The first number is unread messages. The second is total messages on the form. For example, View 1/4 means that there is 1 unread message of 4 messages total. In Process forms will never show this indicator. A message chain on a form must be initiated by the taxing jurisdiction. If you have questions on a form In Process, contact them directly.
Dashboard Sample
Form Restrictions
You may only create one of each type of form from a business found in the Tax Roll Search. For example, if Smith Industrial is found on the search, you may create only one BPP Extension Request and one BPP Listing.
Extension Forms
Starting a New Extension Form
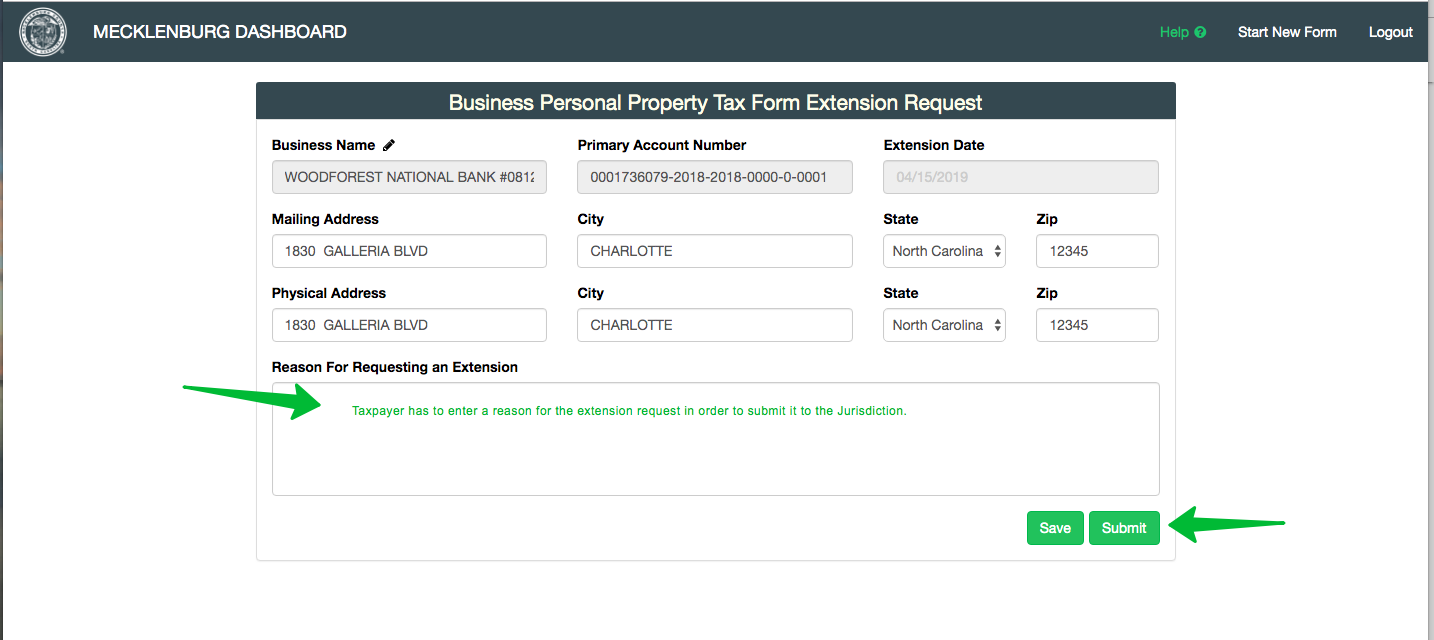
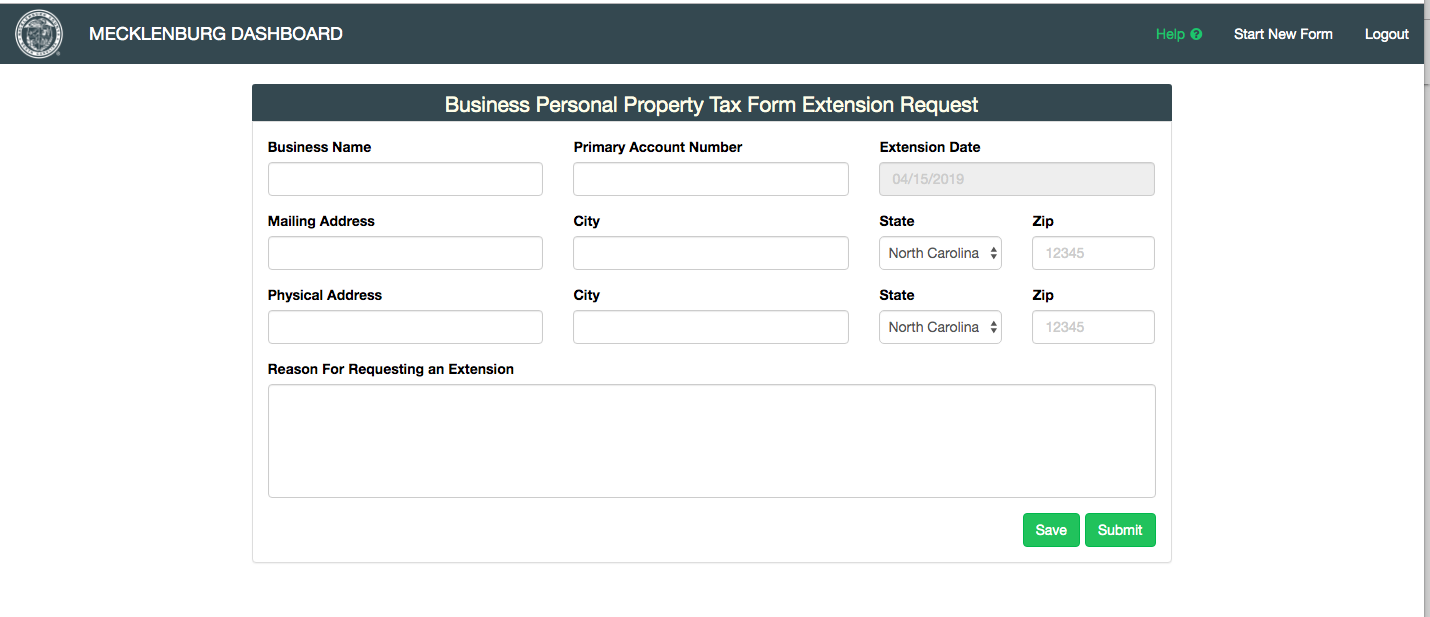
An extension form may be started from either the" Start New Form" tab or the Dashboard. The Start New Form Search provides information from the Jurisdiction tax roll. The taxpayer will enter a business name or other information and click the search tab. If the business is found, use the 'New Extension' tab on the row with the business to begin with a pre-filled form. If the business is not listed, use the 'New Extension' tab in the footer to begin with a blank form. On the Dashboard, use the 'New Extension' tab when available to start a pre-filled form for an existing Business Personal Property Listing Form.
Tax Roll Search Sample
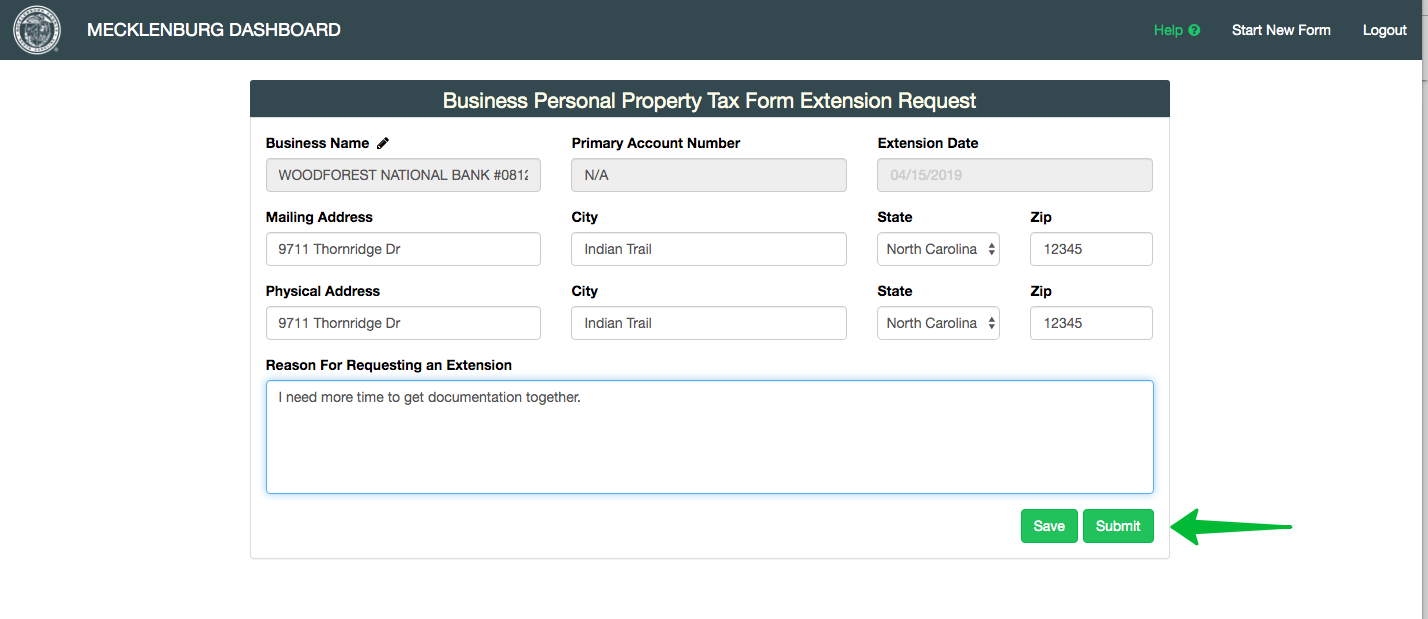
Pre-populated Sample from Jurisdiction Tax Roll (taxpayer needs to enter the reason for the extension request)
Blank Sample is used if unable to find the business
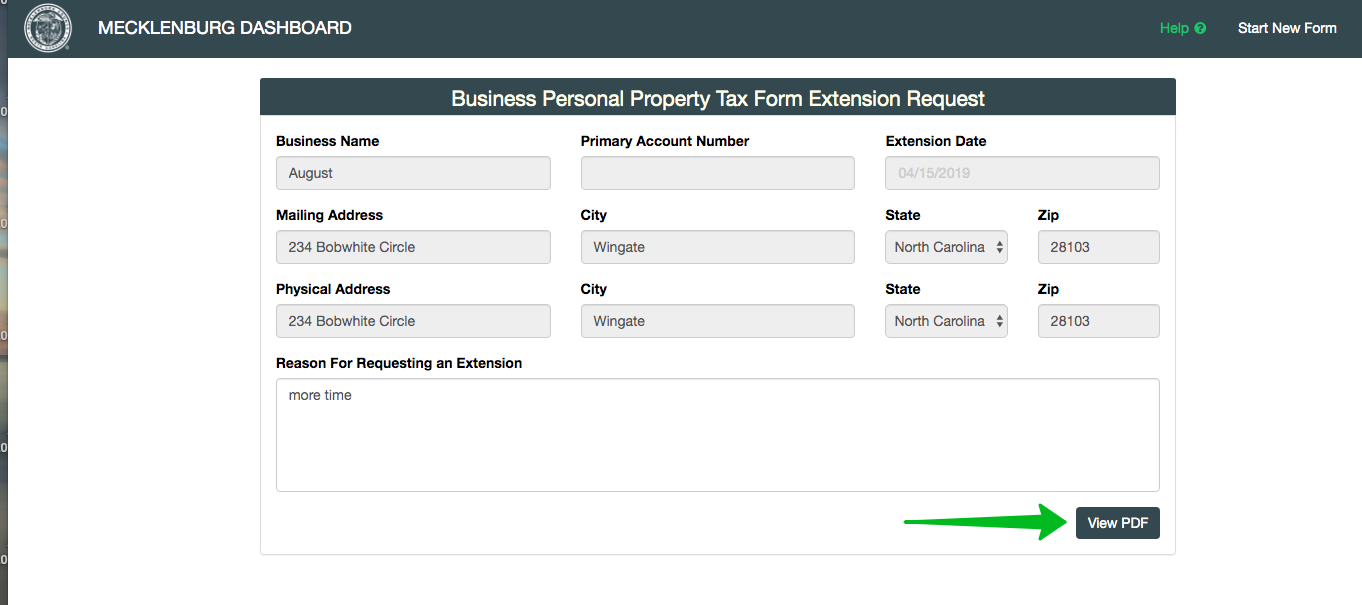
Completing an Extension Form
Once started, fill in the information needed. Any fields marked in grey cannot be changed. The Extension Date will always default to the jurisdiction's final filing date for the Business Personal Property Listing form.
On a blank form, the Account Number is not required. If the business is new or you do not know the account number, the form may be submitted without one. When the jurisdiction assigns or updates the account number, you will receive notification. All other fields are required for submission.
Once started, a copy of the form is automatically saved.
Blank Forms Automatically Saved
Please note: If a blank form is started and no information is entered, you will see the blank form listed on the Dashboard.
After entering information, you may save the form and return to it at any time from the dashboard. Or you may submit the form. You do not have to save the form prior to submission. It will be saved for you.
Resuming a Form from the Dashboard
If saved, the Extension Form will appear with the status of In Process on your dashboard. Use the 'Resume' button to pick up where you left off.
Creating a New Form from The Start New Form (information from the Jurisdiction Tax Roll)
On the dashboard screen the user has the option to create a new listing, a new extension, a brand new listing or view a listing.
To create a new form from the previous year the user should:
- Enter the details of the listing (e.g. name, account number, etc)
- Hit Search
- Then click "New Listing" to create a new form
- This auto-populates the listing information from the Jurisdiction Tax Roll for the current filing year
Once you select the green New Listing tab, an Authorization Affirmation modal will pop up for the taxpayer to confirm
that the business selected is their business. (see below)
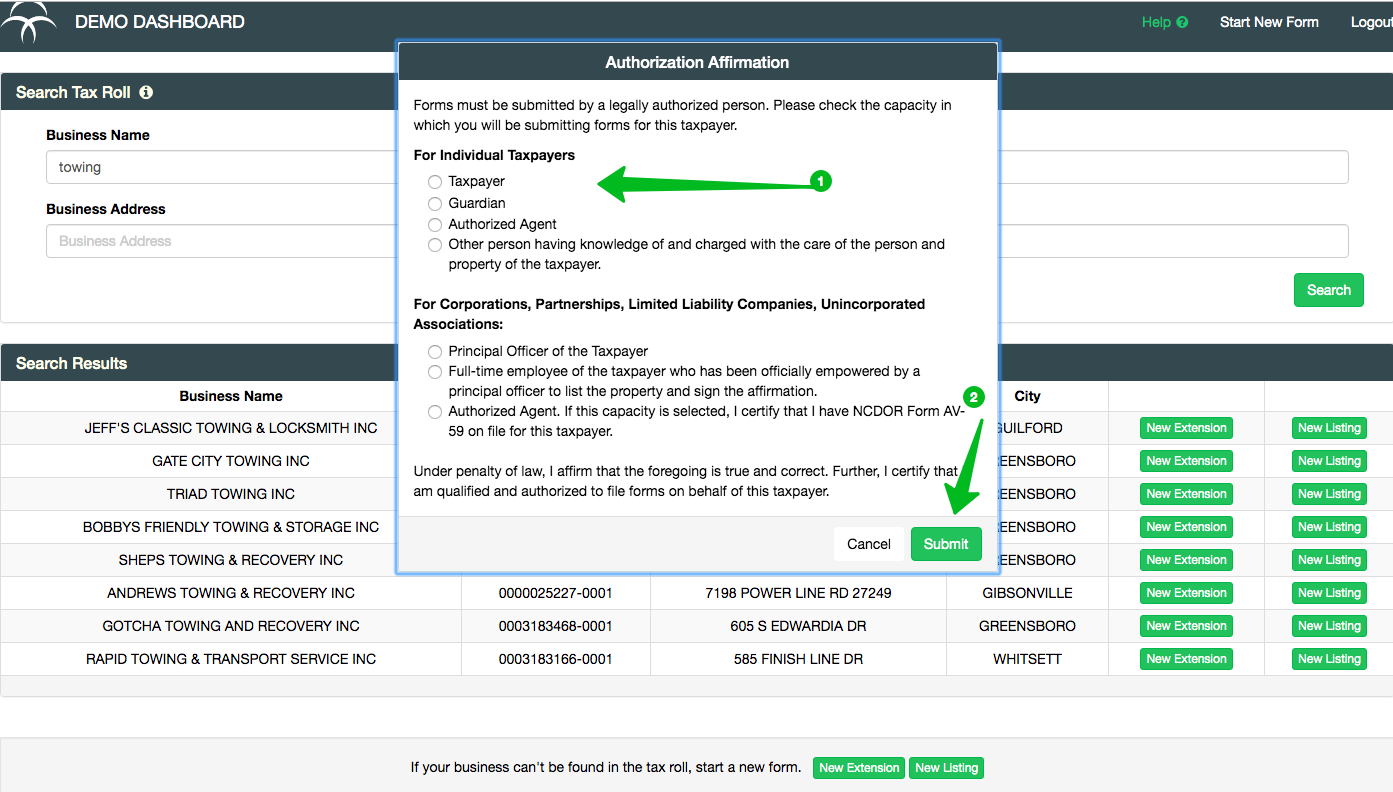
Once you submit the authorization you can start the listing.
Submitting a Form
On clicking the submission, you will receive a notification of the status of the form. If successful, you will be redirected back to the dashboard and the form will show Delivered as the status of the form. You will also receive an email with the updated status of the form:
Successful Delivery
If unsuccessful, a pop up will notify you of the errors on the form, e.g. missing or invalid, and mark them in red so you can correct the errors and resubmit the form.
Errors on Form

Extension Form PDF
At any point after submission, you may view the Extension Form by using the 'View PDF' button. From the view, you may generate a PDF letter format of the form. The PDF can be saved or printed.
Review, Acceptance and Returns
After your Extension form is submitted, it will remain in Delivered status until someone at your jurisdiction begins their review. It is the same as if they opened a letter you mailed to them. You will receive an email notice that your form is now In Review and it will appear within that section of your dashboard.
If your form is accepted, you will receive an email notice with the status update in addition to a message within BizLink. Nothing further is needed.
If your form is returned, you will receive an email notice with the status update in addition to a message within BizLink. You may make edits and resubmit the form.
If your form is marked as inadmissible, you will receive an email notice with the status updated and a reason for the action taken place in addition to a message within BizLink. Please contact your jurisdiction directly to discuss why the form cannot be processed through BizLink.
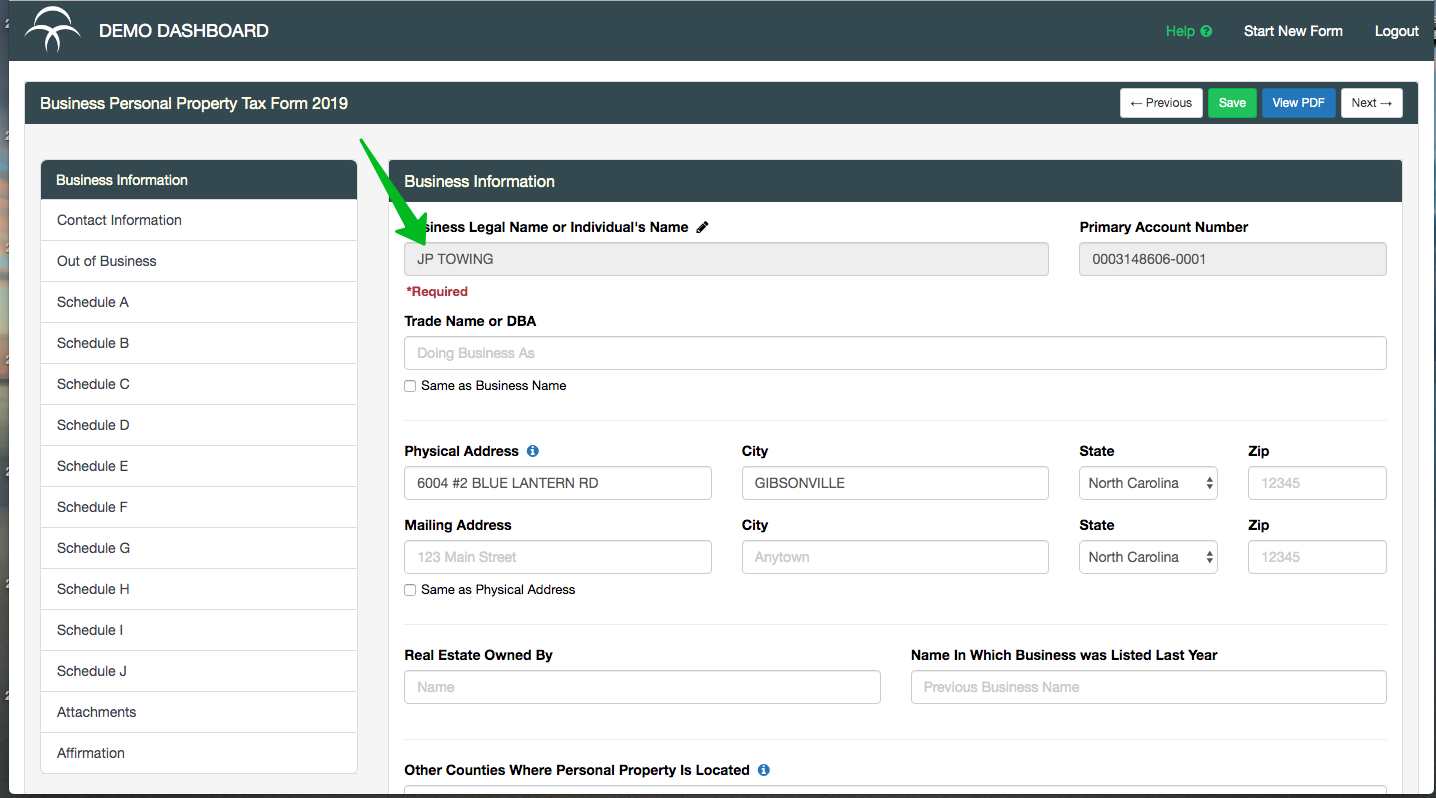
Business Personal Property Listing (BPP) Form
Starting a New BPP Form
A BPP form may be started from either the "Start New Form" Tab or from the Dashboard. Click the "start New Form" tab (data from Jurisdiction tax roll) enter a business name or account number. If the business you are filing for is found, use the 'New Listing' button on the row with the business to begin with a pre-filled form. If the business is not listed, use the 'New Listing' button in the footer to begin with a blank form.
Start New Form Sample (allows taxpayer to search from Jurisdiction Tax Roll)
On the Dashboard, use the 'New Listing' button when available to start a pre-filled form for an existing Extension Request Form.
Completing a BPP Form
Navigation
The TaxScribe BPP form mirrors the North Carolina Department of Revenue Business Personal Property Form Listing Form and Related Schedules:(https://files.nc.gov/ncdor/documents/files/2020_listingform_traditional_v1_Final_Secured.pdf. You may navigate through the form one of two ways. First, you can use the 'Next' and 'Back' buttons to move forward and backward. Second, you may directly select a section or a schedule from the menu on the left.
Navigation Views
Depending on your screen resolution, you may need to scroll down to see the bottom navigation buttons and / or the lower items in the left menu. Additionally you may need to scroll in order to complete section / schedule information.
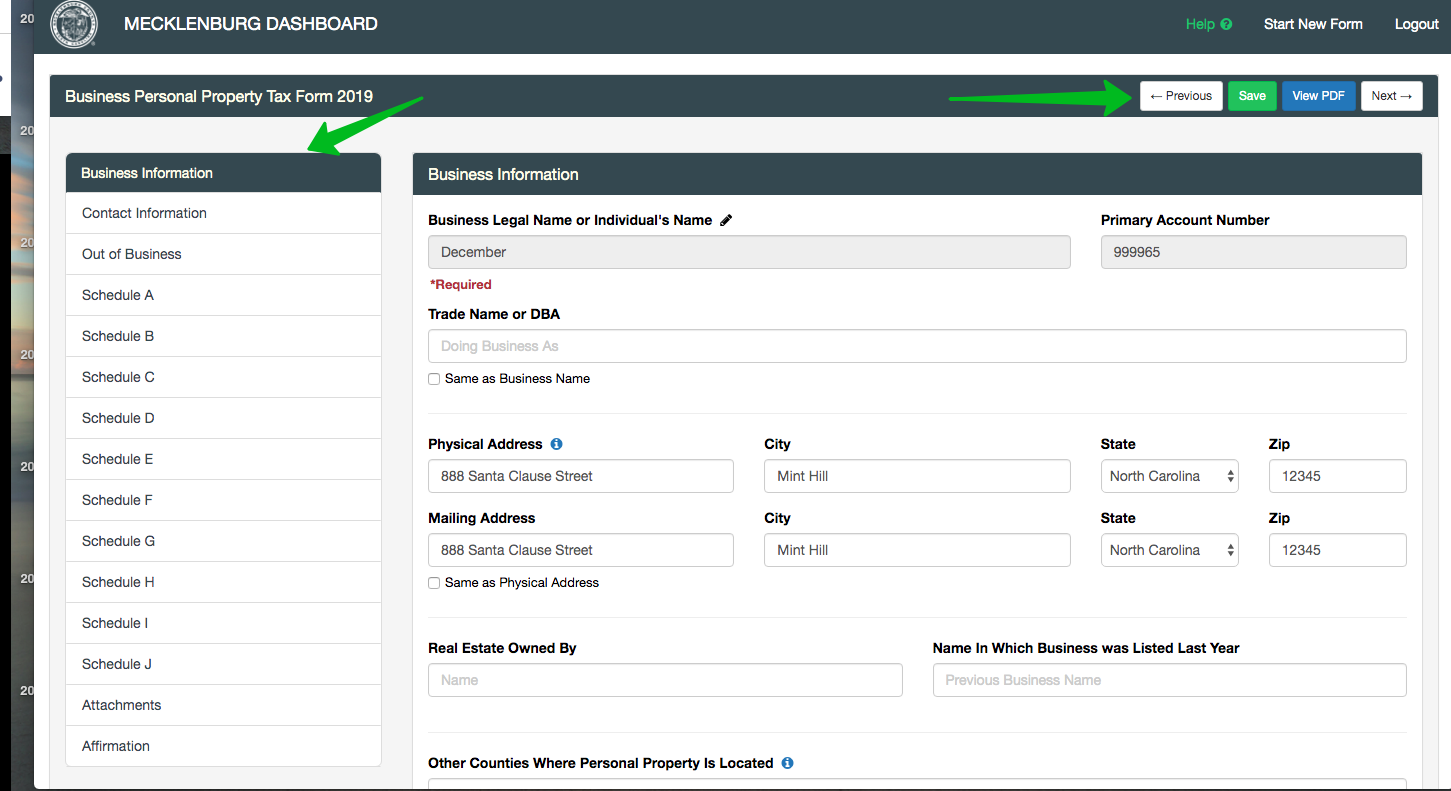
Saving and Resuming
As you complete the form, your information will be automatically saved for you. You may resume the form at any time from the dashboard.
Schedule A: Group Navigation
On Schedule A, click the group name to open it and enter your information. The groups may be opened in any order, but it is recommended to complete them sequentially. Select 'Not Applicable' if that group is not needed for your filing. If 'Not Applicable' is selected, the group will not open until you uncheck the box. If data has been entered in a group and 'Not Applicable' is then selected, you will be prompted to confirm erasing the data.
Opening a Group
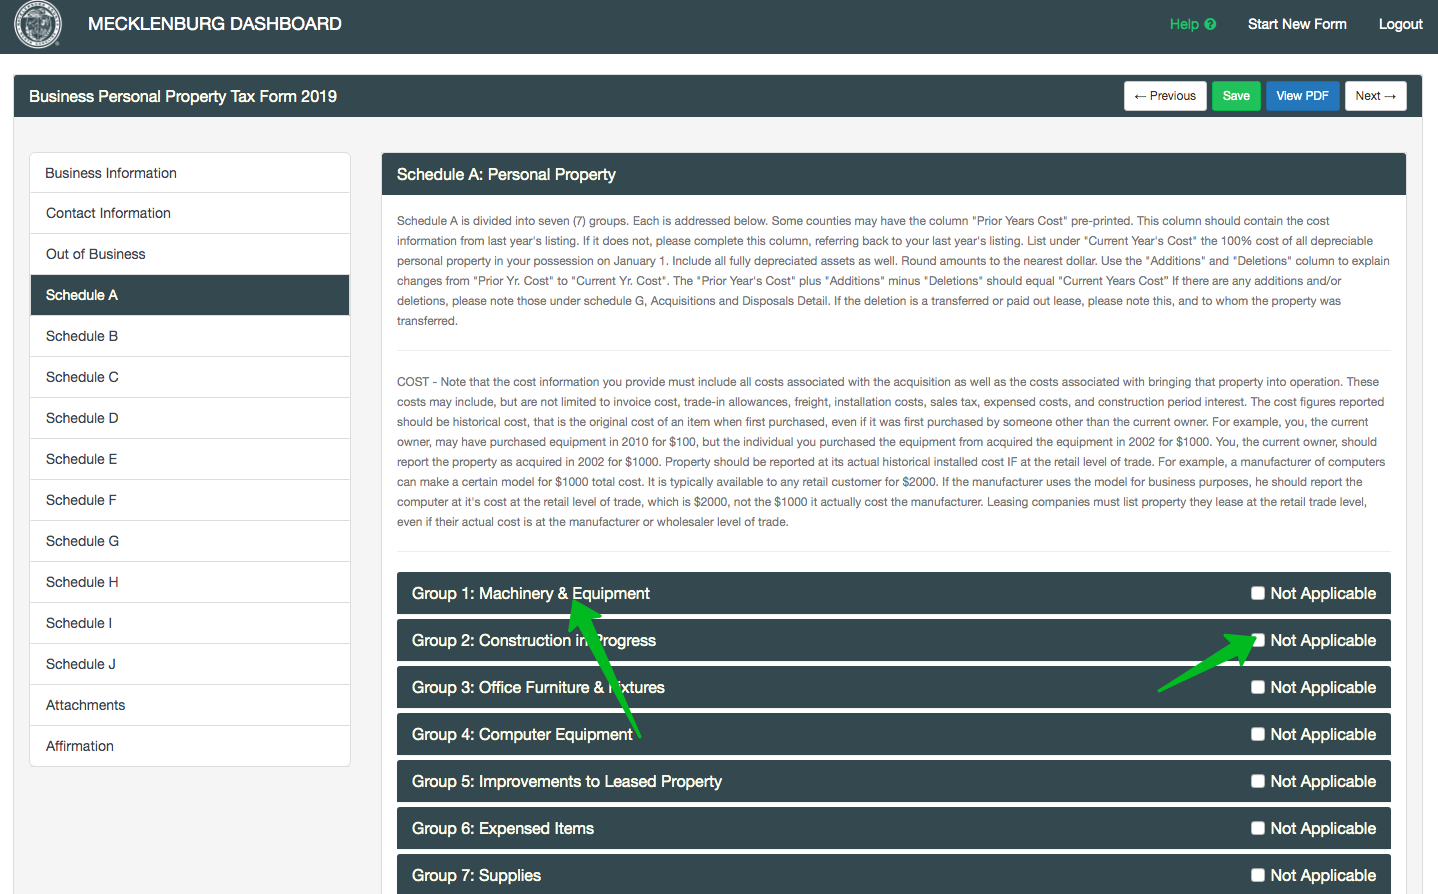
Open Group Sample
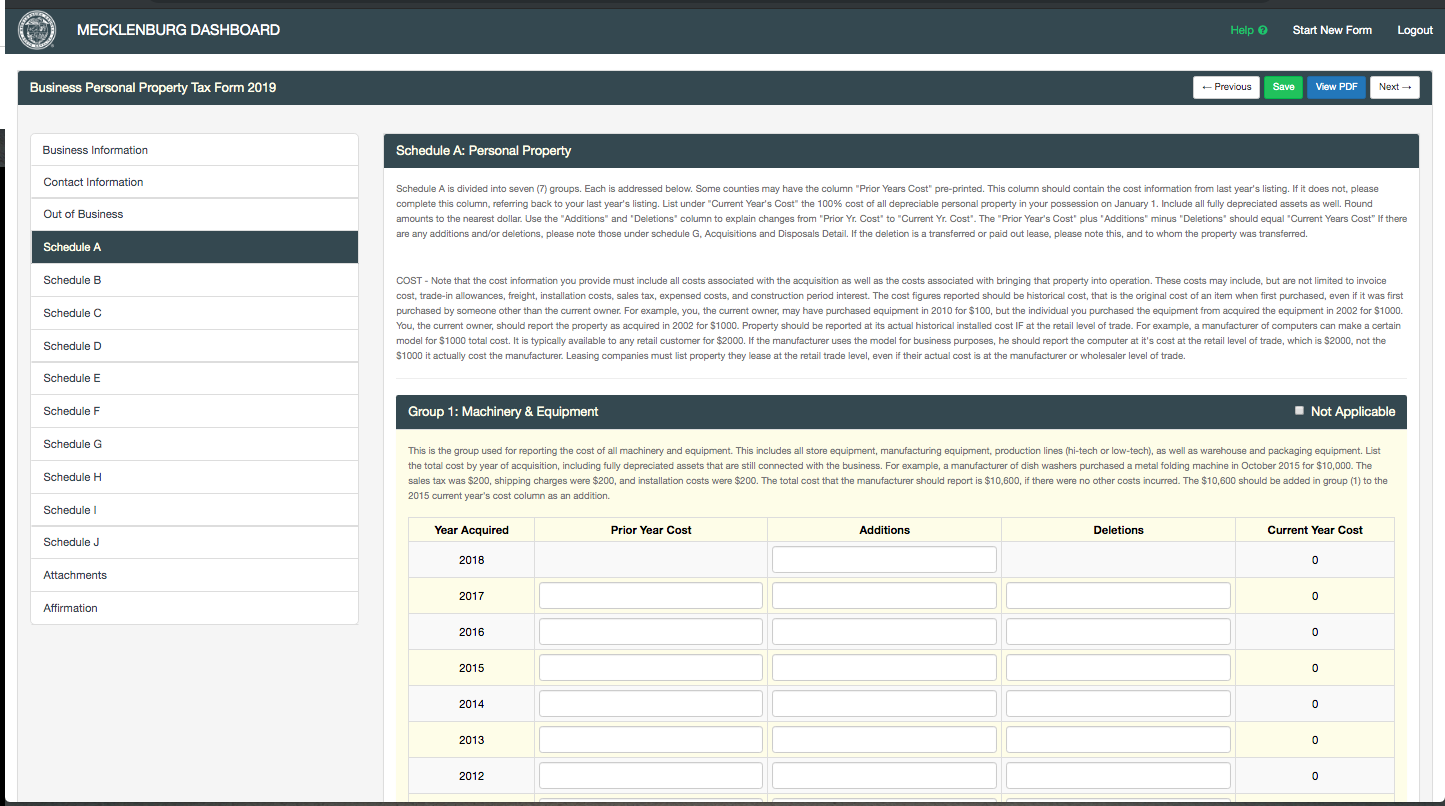
Clicking the next group's header will close the prior group and open the selected one. As an example using the screen above, if 'Group 2: Construction in Progress' is selected, Group 1 will close and Group 2 will open.
Schedule Information Add Rows or Attachments
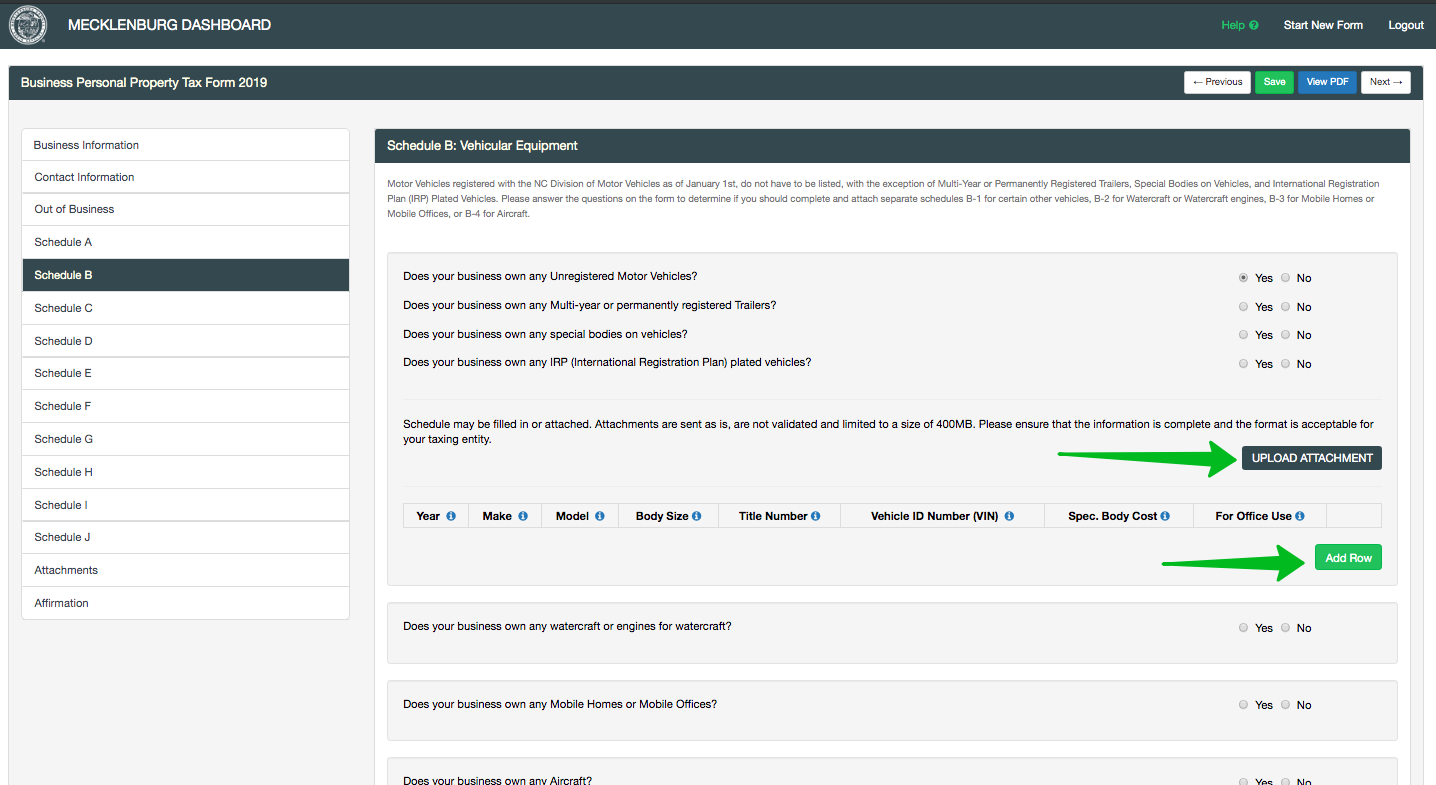
If 'Yes' is selected on a schedule, there are two options for providing the information. First is completing the information online. To do this, use the 'Add Row' button to open a row in which you may enter the information. Once a row is opened, all fields within the row are required, except on Schedule G where Acquisitions and Disposals are treated separately. The second option is to attach a file, e.g. Excel. To do this, use the 'Upload Attachment' button. Either or both options are allowed when 'Yes' is selected. Only one attachment per schedule is allowed. Any other files may be added using the attachments section. If data has been entered on a Schedule and 'No' is then selected, you will be prompted to confirm erasing the data and / or removing the attachment.
Add Row or Attachment Sample
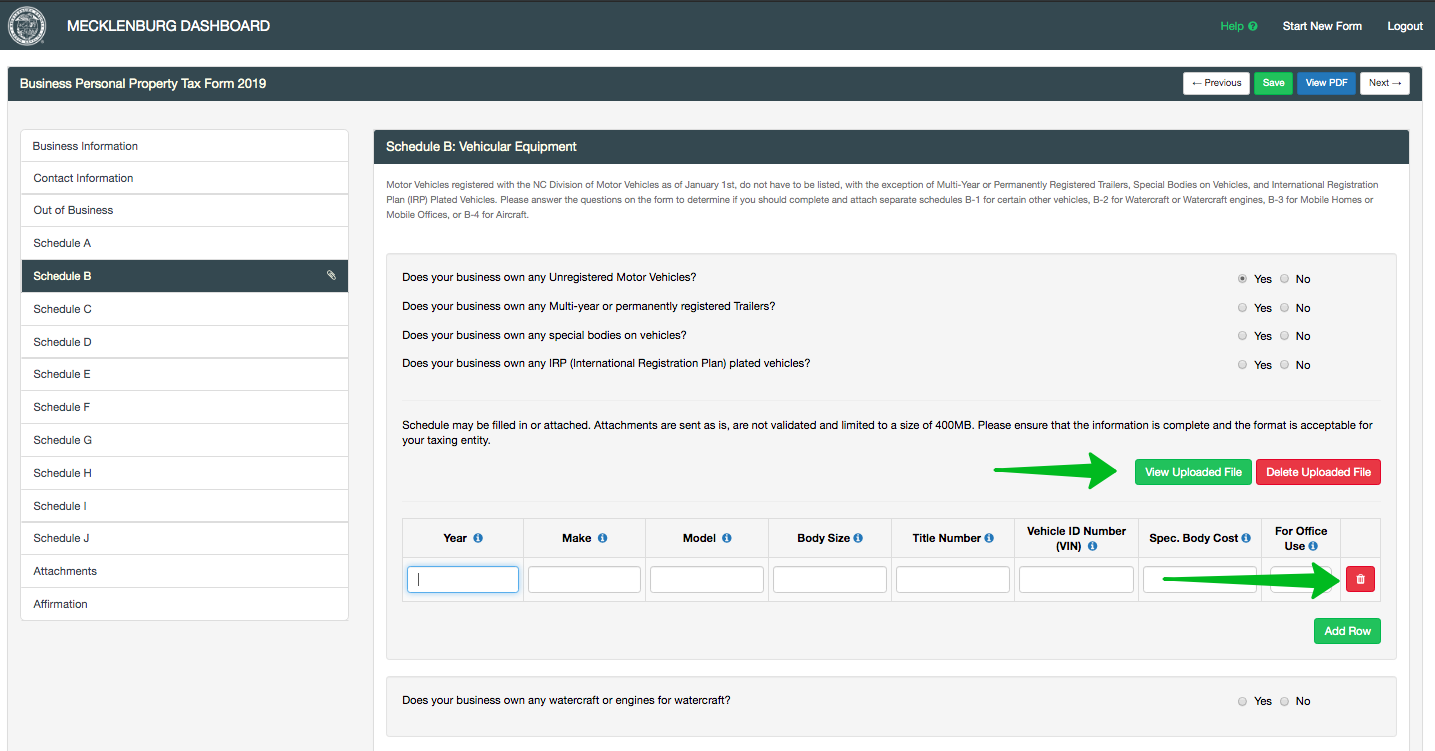
After adding a row or an attachment, that information can be deleted if necessary using the red 'trash can' button on a row or the 'Delete Uploaded File' button.
Delete Row or Attachment Sample
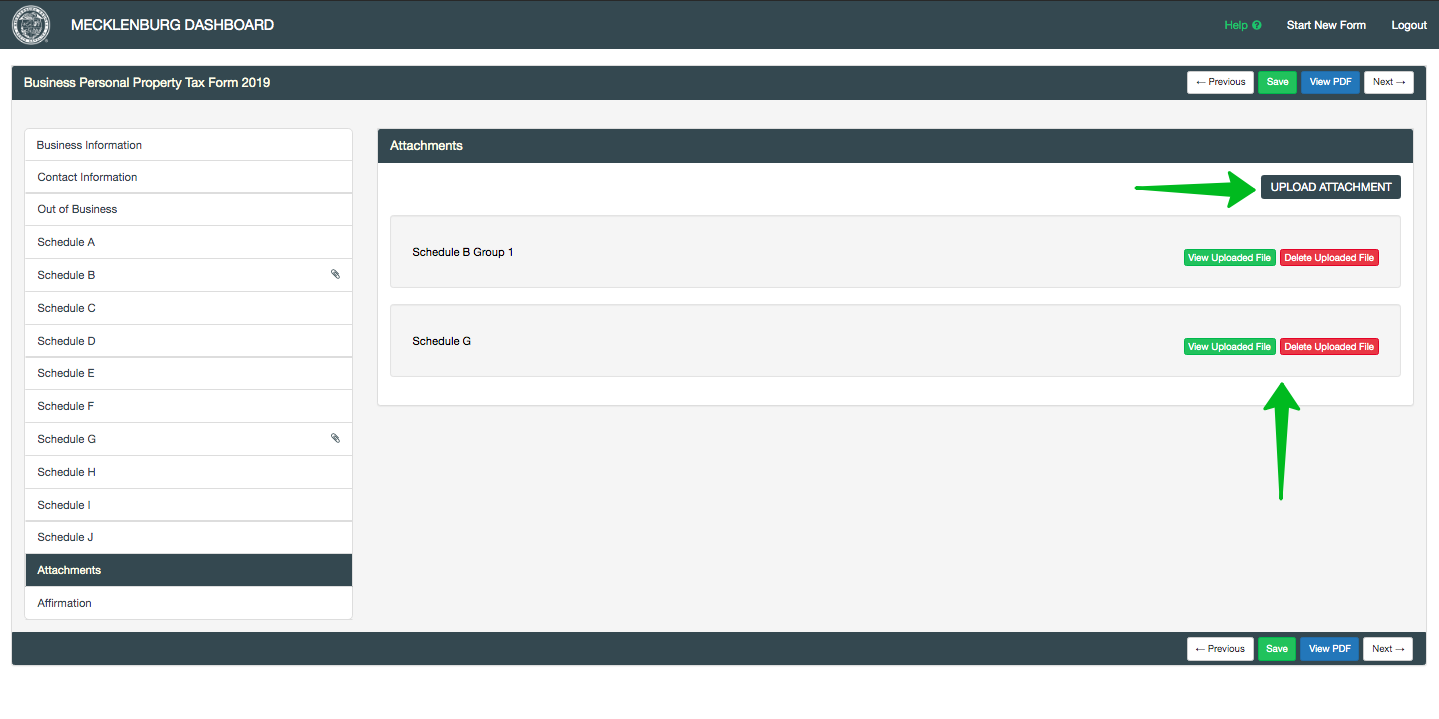
Attachments Section
All attachments are available for viewing or deletion within the Attachments Section. You may also upload additional files using the 'Upload Attachment' button.
Form Requirements
The online BPP form was designed to be flexible and has very few required fields for submission. Only the business name, Schedule A, and the Affirmation are required in order to submit a form, however each section must have a yes or no answer in order for the form to be submitted. In the case where a business is Out of Business, Schedule A is not required.
Field Requirements
Where applicable the form will enforce correct formats on field entry, e.g. date, zip, phone, etc. A red indicator will show up on the left side bar if any of the schedules are incomplete or have an error. Once the section is corrected the form can be resubmitted.
Affirmation and Submission
In order to submit a form, you must complete the Affirmation section. Your email id is confirmed and used as your electronic signature.
Review, Acceptance and Returns
After your BPP form is submitted, it will remain in Delivered status until someone at your jurisdiction begins their review. It is the same as if they opened a letter you mailed to them. You will receive an email notice that your form is now In Review and it will appear within the status section of your dashboard.
If your form is approved, you will receive an email notice in addition to a status message within BizLink. Nothing further is needed.
If your form is returned, you will receive an email notice in addition to a status message within BizLink. You may make edits and resubmit the form.
If your form is marked as inadmissible, you will receive an email notice in addition to a status message within BizLink. Please contact your jurisdiction directly to discuss why the form cannot be processed through BizLink.
BizLink Instructional Videos
Listing Submission
- Walkthrough from start to finish on how to submit a listing
Dashboard Overview
- Learn how to navigate the dashboard
Extension Submission
- Walkthrough on how to submit an Extension
Create a BizLink Account
- How to create a BizLink account